Quantcast
Channel: SharePoint Field Notes
Viewing all 70 articles
Browse latest View live

Using SharePoint 2013 REST API To Check User Permissions

$
0
0
Technorati Tags: ,,

Recently I have been working on a JavaScript app model project where I wanted to check the current user’s permissions within the site and on a particular list. As always I strive to use the SharePoint REST API when ever I can. So I looked at the the DoesUserHavePermissions method of the SPWeb. I used the SPRemoteAPIExplorer extension to look up this method to see what was needed to call it using REST. Version 2.0 now exposes complex types and the SP.BasePermissions type is used as an argument to this method. I wanted to check if the user had the ability to edit list items on the web. Looking at the generated ajax REST code from SPRemoteAPIExplorer I noticed it had two properties, High an Low. Since the SP.BasePermissions type is a flags type enumeration where you can combine permissions, these two properties represent the high order 32 bit integer and the low order 32 bit integer to a 64 bit integer representing the permission. The problem was how would I determine the high and low order of a given enumeration in JavaScript?

I wanted to avoid using JSOM and do everything with REST. Fortunately, I understand that you must rely on JSOM for certain things. In this case JSOM has the SP.BasePermissions type with methods for combining sets of permissions. This type is defined in SP.js. JSOM also exposes the types of permissions as a basic integer enumeration as SP.PermissionKind. This enumeration is defined in SP.Runtime.js.  I still could not figure out how to get the high an low values for the permission. I knew what the values were supposed to be for the EditLisitItems permission. Looking at the permission in debug view I noticed the values were exposed by the typical nonsensical property names $4_1 and $5_1 . When ever you set the permission with a permission kind the JSOM function will bit shift the values and re-calculate the high and low values.

The final thing to note is that even though the high and low values are 32 bit integers they must be sent as strings, otherwise you will get an error stating that it could not convert the primitive value to a EDM.Int64. The SharePoint REST processor expects these a strings when converting to a 64 bit integer. Why?  JavaScript does not support 64 bit integers and thus anything in a JSON payload would always be expected to be a string.  This is why when dealing with entities that represent 64 bit integers the JavaScript model will typically have a High and Low property. Mozilla has an example of something similar to SP.BasePermissions with its UInt64 type js-ctypes.

An example of a successful REST call to DoesUserHavePermissions :

function getUserWebPermissionREST() {
var hostweburl = decodeURIComponent(getQueryStringParameter('SPHostUrl'));
var appweburl = decodeURIComponent(getQueryStringParameter("SPAppWebUrl"));
var restSource = appweburl + "/_api/web/doesuserhavepermissions";

//still need jsom to get high order and low order numbers of a permission
var perm = new SP.BasePermissions();
perm.set(SP.PermissionKind.editListItems);

$.ajax(
{
'url': restSource,
'method': 'POST',
'data': JSON.stringify({
'permissionMask': {
'__metadata': {
'type': 'SP.BasePermissions'
},
'High': perm.$4_1.toString(),
'Low': perm.$5_1.toString()
}
}),
'headers': {
'accept': 'application/json;odata=verbose',
'content-type': 'application/json;odata=verbose',
'X-RequestDigest': $('#__REQUESTDIGEST').val()
},
'success': function (data) {
var d = data.d.DoesUserHavePermissions;
},
'error': function (err) {
alert(JSON.stringify(err));
}
}
);
}

No matter how hard you try you still need to use JSOM


Trying to do everything using SharePoint REST is very difficult. When dealing with permissions it is much easier to leverage the built-in JSOM enumerations and SP.BasePermissions type rather than tying to replicate the same logic in your own libraries.  Also if your doing app model development you will need to use the SP.AppContextSite to get the context of the host web. So when doing app model development use REST as much as possible and use common sense when to use JSOM.  I hope this post helps you understand the reasoning for the SP.BasePermissions structure and its methods and why SharePoint REST uses a high and low property to represent a 64 bit integer for permissions. It would be nice if Microsoft would put actual friendly names around the $4_1 and $5_1 properties. 


Uploading Documents and Setting Metadata Using SharePoint REST (One Version)

$
0
0
Technorati Tags: ,,

There are many examples of uploading documents using SharePoint 2013 REST/CSOM/JSOM and there are many issues. One issue is uploading documents into SharePoint Online with CSOM/JSOM. There is a 1.5mb limit. I work for a SharePoint ECM company and we have many customers that have documents much larger than 1.5mb. One way around this limitation is to use the SharePoint REST API which is limited  to 2gb. Just remember that REST requires you to post a byte array, and does not support reading from a stream. This can put a strain on memory resources.

Another issue is customers have versioning turned on and will complain that your solution creates two versions when uploading documents and setting metadata. This has always been a challenge when using SharePoint’s remote API. You can still use RPC which enables you to post the binary and the metadata in one call and only create one version. However, this can only be used from native apps and is limited to 50mb. You can upload and create only one version with CSOM/JSOM/REST by checking out the file before setting the metadata and then checking the file back in afterwards using the SPCheckinType.OverwriteCheckin. This works. However, if you try to check the file in and any field level validation fails, the check in fails. JavaScript code below.

function addFile() {   

getFileBuffer().done(function (result) {
upload(result.filename,result.content).done(function (data) {
var file = data.d;
checkOut(file.ServerRelativeUrl).done(function () {
updateMetadata(file.ServerRelativeUrl, null).done(function () {
checkIn(file.ServerRelativeUrl).done(function () { });
})
})

})
}).fail(function (err) {
var e = err;
});
}

function getFileBuffer() {
var file = $('#documentUpload')[0].files[0];
var fileName = file.name;
var dfd = $.Deferred();
var reader = new FileReader();

reader.onloadend = function (e) {
var result = { 'filename': fileName, 'content': e.target.result };
dfd.resolve(result);
}
reader.onerror = function (e) {
dfd.reject(e.target.error);
}

reader.readAsArrayBuffer(file);
return dfd;
}

function upload(filename, content) {
appweburl = decodeURIComponent(getQueryStringParameter('SPAppWebUrl'));
hostweburl = decodeURIComponent(getQueryStringParameter('SPHostUrl'));
var restSource = appweburl +
"/_api/SP.AppContextSite(@target)/web/lists/getbytitle('Documents')/rootfolder/files/add(url='" + filename + "',overwrite=true)?@target='" + hostweburl + "'";
var dfd = $.Deferred();

$.ajax(
{
'url': restSource,
'method': 'POST',
'data': content,
processData: false,
'headers': {
'accept': 'application/json;odata=verbose',
'X-RequestDigest': $('#__REQUESTDIGEST').val(),
"content-length": content.byteLength
},
'success': function (data) {
var d = data;
dfd.resolve(d);
},
'error': function (err) {
dfd.reject(err);
}
}
);

return dfd;
}
function checkOut(fileUrl) {
appweburl = decodeURIComponent(getQueryStringParameter('SPAppWebUrl'));
hostweburl = decodeURIComponent(getQueryStringParameter('SPHostUrl'));
var restSource = appweburl +
"/_api/SP.AppContextSite(@target)/web/lists/getbytitle('Documents')/rootfolder/files/getbyurl(url='" + fileUrl + "')/checkout?@target='" + hostweburl + "'";
var dfd = $.Deferred();
$.ajax(
{
'url': restSource,
'method': 'POST',
'headers': {
'accept': 'application/json;odata=verbose',
'content-type': 'application/json;odata=verbose',
'X-RequestDigest': $('#__REQUESTDIGEST').val()
},
'success': function (data) {
var d = data;
dfd.resolve(data.d);
},
'error': function (err) {
dfd.reject(err);
}
}
);

return dfd;

}
function updateMetadata(fileUrl) {

appweburl = decodeURIComponent(getQueryStringParameter('SPAppWebUrl'));
hostweburl = decodeURIComponent(getQueryStringParameter('SPHostUrl'));
var restSource = appweburl +
"/_api/SP.AppContextSite(@target)/web/lists/getbytitle('Documents')/rootfolder/files/getbyurl(url='" + fileUrl + "')/listitemallfields?@target='" + hostweburl + "'";
var dfd = $.Deferred();

$.ajax(
{
'url': restSource,
'method': 'POST',
'data': JSON.stringify({
'__metadata': {'type':'SP.ListItem'},
'Title': 'My Title 3'
}),
'headers': {
'accept': 'application/json;odata=verbose',
'content-type': 'application/json;odata=verbose',
'X-RequestDigest': $('#__REQUESTDIGEST').val(),
'X-Http-Method': 'PATCH',
"If-Match": "*"
},
'success': function (data) {
var d = data;
dfd.resolve();
},
'error': function (err) {
dfd.reject();
}
}
);

return dfd;

}
function checkIn(fileUrl) {
appweburl = decodeURIComponent(getQueryStringParameter('SPAppWebUrl'));
hostweburl = decodeURIComponent(getQueryStringParameter('SPHostUrl'));
var restSource = appweburl +
"/_api/SP.AppContextSite(@target)/web/lists/getbytitle('Documents')/rootfolder/files/getbyurl(url='" + fileUrl + "')/checkin?@target='" + hostweburl + "'";
var dfd = $.Deferred();

$.ajax(
{
'url': restSource,
'method': 'POST',
data: JSON.stringify({
'checkInType': 2,
'comment': 'whatever'
}),
'headers': {
'accept': 'application/json;odata=verbose',
'content-type': 'application/json;odata=verbose',
'X-RequestDigest': $('#__REQUESTDIGEST').val()
},
'success': function (data) {
var d = data;
dfd.resolve(data.d);
},
'error': function (err) {
dfd.reject(err);
}
}
);

return dfd;

}

Use the ValidateUpdateListItem Method


If your going to be setting or updating metadata using the SharePoint’s remote API, then I suggest you use the SP.ListItem’s new ValidateUpdateListItem method. This method is available only through the remote API and is new to SP2013. ValidateUpdateListItem  is very similar to the UpdateOverwriteVersion method available on the server API. ValidateUpdateListItem sets the metdata and if the bNewDocumentUpdate argument is set to true will call the UpdateOverwriteVersion method which will update without incrementing the version. This eliminates the need to make the extra calls to check out and check in the document. It also will check in the document if it is already checked out and use the checkInComment argument.  The method takes multiple SP.ListItemFormUpdateValue types as arguments. This type takes the internal name of the field along with a value.

function updateMetadataNoVersion(fileUrl) {
appweburl = decodeURIComponent(getQueryStringParameter('SPAppWebUrl'));
hostweburl = decodeURIComponent(getQueryStringParameter('SPHostUrl'));
var restSource = appweburl +
"/_api/SP.AppContextSite(@target)/web/lists/getbytitle('Documents')/rootfolder/files/getbyurl(url='" + fileUrl+ "')/listitemallfields/validateupdatelistitem?@target='" + hostweburl + "'";

var dfd = $.Deferred();

$.ajax(
{
'url': restSource,
'method': 'POST',
'data': JSON.stringify({
'formValues': [
{
'__metadata': { 'type': 'SP.ListItemFormUpdateValue' },
'FieldName': 'Title',
'FieldValue': 'My Title2'
},
{
'__metadata': { 'type': 'SP.ListItemFormUpdateValue' },
'FieldName': 'testautodate',
'FieldValue': 'asdfsdfsdf'
}
],
'bNewDocumentUpdate': true,
'checkInComment': ''
}),
'headers': {
'accept': 'application/json;odata=verbose',
'content-type': 'application/json;odata=verbose',
'X-RequestDigest': $('#__REQUESTDIGEST').val()
},
'success': function (data) {
var d = data;
dfd.resolve(d);
},
'error': function (err) {
dfd.reject(err);
}
}
);

return dfd;
}

The efficiency of this method is reflected in its return type which is a list of SP.ListItemFormUpdateValue . This type contains the validation response for each field being updated. You can use the ListItemFormUpdateValue.HasException property to check for errors then use the ErrorMessage property to log or inform the user.


I Prefer ValidateUpdateListItem


Below is the revised code of adding a file using the ValidateUpdateListItem method.

function addFile() {   

getFileBuffer().done(function (result) {
upload(result.filename,result.content).done(function (data) {
var file = data.d;
updateMetadataNoVersion(file.ServerRelativeUrl).done(function () {

})
})
}).fail(function (err) {
var e = err;
});
}

The ValidateUpdateListItem method eliminates extra remote calls and allows you to handle multiple validation errors. Using this method along with REST you can efficiently upload a document up to 2gb and create only one version. You can also use this method to update metadata without having to create new file. Just set the bNewDocumentUpdate argument to true and this will not increment the version.

Understanding SharePoint 2013 REST API Responses

$
0
0
Technorati Tags: ,,,,

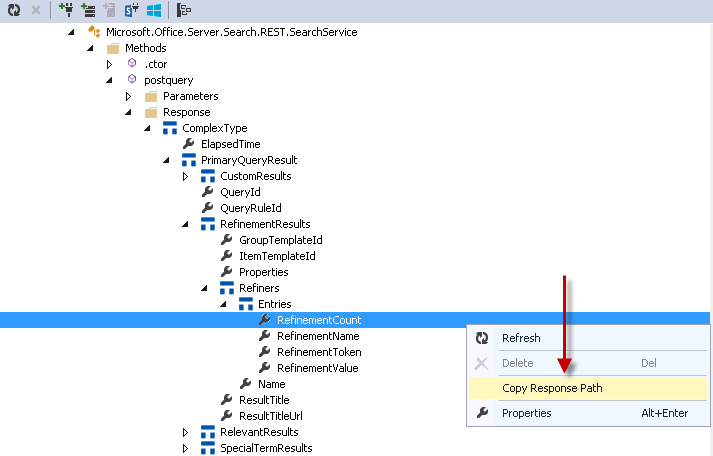
I have been using the SPRemoteAPIExplorerVisual Studio Extension a lot. It has been a great help in understanding what inputs are required when making endpoint calls. Of course it is incredibly easy to generate the actual jQuery code with the new 2.0 feature.  However, something was missing. When I started using REST the more I discovered that the responses sent back were difficult to navigate. It took multiple steps to visualize what the responses looked like using either the browser developer tools or the new Visual Studio JSON visualizer. This was slowing down my development. It would be nice to know what to expect from a REST call so I could write the code to get what I wanted. The MSDN documentation is getting better but the response documentation is sparse, or the JSON shown is hard to understand. So to make my REST development much more productive I decided to add the responses for remote calls to the SPRemoteAPIExplorer in version 2.5. I also added the ability to copy the JSON path from a response to so you can copy it directly into your code. Having to remember the deeply nested JSON path of a response property can be daunting and error prone since the JSON path is case sensitive. For example, the REST response from the postquery method when searching returns an undocumented complex type. This type has many nested complex types. Trying to figure out where or if the data in a response exists could be an hour long web search or a lot of stepping through code and using visualizers. This can be much easier.


Copy the JSON Path

You can right click on any part of a response and select the “Copy Response Path” menu item. This will generate the JSON path to be used in your code. This feature is immensely helpful if you don’t know the rules of how different response types are returned. For example all“multivalue” types are returned as object arrays in JavaScript. The items are always included in an array named“results”.  Multivalued types include “Feeds”, “Arrays” and “Collections”. All three of these types are possible responses in the SharePoint Remote API.  Another unknown rule when getting JSON responses is that the method name is included in the JSON when the response is either a complex type or a primitive type. The example below shows that the“postquery” method name is appended because it returns a complex type.

Here is the output:

data.d.postquery.PrimaryQueryResult.RefinementResults.Refiners.results[0].Entries.results[0].RefinementCount

REST Response Types

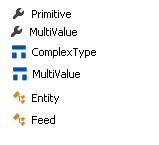
Rest responses come in three flavors. Below are the icons used to display them in the response. Each type has a corresponding “multivalued” icon.

Primitives of course are string, integers, boolean and date. Complex types are types that are not defined in the entity model but are used as parameters to methods or returned in responses. Entities are the entities defined in the SharePoint Remote API model and can have both properties and methods. Entities returned as arrays or collections are considered feeds. When expanding any of the multivalued type icons you will see the properties of the underlying child item and not the properties of the collection itself.

The Complexity of Responses

As you use this tool you will discover that complex types can be embedded in entities. Many of the complex types are undocumented and internal within the object model. This tool will give you 99% reliable and accurate information on how to use and consume the SharePoint Remote API.  The other 1% like a “DataTable” in the Table property of a RelevantResult returned by search are hard coded and are not exposed. I am working on fixing that. In the meantime, with this release I have also fixed the generation of $ajax jQuery calls for methods that are tagged as “IntrinsicRestFul”. These method types were discussed in a previous post. Intrinsic RestFul. SPRemoteAPIExplorer has made my REST API coding incredibly productive. With the new Response and Response Path features it should be even easier for you.

SharePoint 2013 ClientPeoplePicker Using REST

$
0
0

One of the benefits of using the SPRemoteAPIExplorer extension  is you can run across functionality that you did not know existed in the SharePoint REST API. Many developers use CSOM/JSOM to implement the PeoplePicker in their applications.  Both Richard diZerega’s  Real World Apps for SharePoint 2013 and Jeremy Thake’s  Using Multiple PeoplePickers in SharePoint 2013 Hosted Apps with AngularJS are great articles explaining how to do this using JSOM.  Many developers have asked if there is a simpler way of implementing a PeoplePicker without having to load the dependent JavaScript files.  This has been difficult with provider hosted apps since by default it does not include  an app web. You can get a sample of how to add  the people picker control to a provider hosted app from the Office App Model Samples v2.0 in the Components\Core.PeoplePicker folder AMS App Model Samples.  There is also the experimental office widget that implements a people picker control for provider hosted apps Widgets for Provider Hosted Apps. The good news is that you can implement your own people picker using the “_api/SP.UI.ApplicationPages.ClientPeoplePickerWebServiceInterface.clientPeoplePickerSearchUser” endpoint along with jquery-UI. It does not require having to load any of the dependent js files and makes it very easy to implement multiple people pickers. In this post I will show you sample code on how you can set up one ajax rest function to service mulitple jquery-ui autocomplete text boxes. The endpoint gives you maximum flexibility on how to control the searching for users and I will explain what each parameter means.

Picking Apart the People Picker

The above shows two jquery-ui  autocomplete text boxes both using the same function to suggest people. The first box is configured to allow suggesting users and groups and the second one only allows suggesting users.  This was easy to implement by just adding two input elements to page and then in the javascript attaching the function to do the search using jquery-ui.

$(document).ready(function () {
$("#txtPeoplePicker").autocomplete({
source: search,
minLength: 2
});
$("#txtPeoplePicker2").autocomplete({
source: search,
minLength: 2
});
});

The code below shows the search function that is called which is using the REST API to get the suggestions. Note that I added a principalType attribute to each html input element to allow changing the behavior of the of what is returned. You can add as many attributes you want and use them in your function to change any of the query parameters.

function search(request,response) {
var appweburl = decodeURIComponent(getQueryStringParameter('SPAppWebUrl'));
var hostweburl = decodeURIComponent(getQueryStringParameter('SPHostUrl'));

var restSource = appweburl + "/_api/SP.UI.ApplicationPages.ClientPeoplePickerWebServiceInterface.clientPeoplePickerSearchUser";
var principalType = this.element[0].getAttribute('principalType');
$.ajax(
{
'url':restSource,
'method':'POST',
'data':JSON.stringify({
'queryParams':{
'__metadata':{
'type':'SP.UI.ApplicationPages.ClientPeoplePickerQueryParameters'
},
'AllowEmailAddresses':true,
'AllowMultipleEntities':false,
'AllUrlZones':false,
'MaximumEntitySuggestions':50,
'PrincipalSource':15,
'PrincipalType': principalType,
'QueryString':request.term
//'Required':false,
//'SharePointGroupID':null,
//'UrlZone':null,
//'UrlZoneSpecified':false,
//'Web':null,
//'WebApplicationID':null
}
}),
'headers':{
'accept':'application/json;odata=verbose',
'content-type':'application/json;odata=verbose',
'X-RequestDigest':requestDigest
},
'success':function (data) {
var d = data;
var results = JSON.parse(data.d.ClientPeoplePickerSearchUser);
if (results.length > 0) {
response($.map(results, function (item) {
return {label:item.DisplayText,value:item.DisplayText}
}));
}
},
'error':function (err) {
alert(JSON.stringify(err));
}
}
);


}

Working with the response


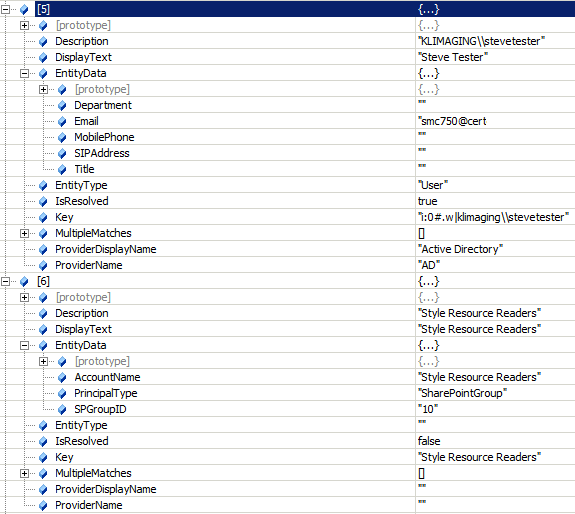
Unfortunately, the response from the REST call is a string. Typically, all the REST responses in SharePoint will return objects as entities and complex types. In this case the object is a string. At first I thought I was going to have to use the context.parseJSONObject call from CSOM but you can just use JSON.parse and it will create the JSON object array. The response is undocumented. I am hoping Microsoft will expose this within the EDM model in future versions. I already voted for this on user voice UserVoice. Below is an example of what is returned.


Element number 5 is a user and Element 6 represents a SharePoint group. Note the EntityData is different.  The code just uses the DisplayText property to set both the return label and value used by jquery-ui.


What about all those parameters?


The REST API gives you many options to affect the results  a search using the ClientPeoplePickerQueryParameters object. Trying to figure out how these parameters affected searching  was daunting. Many of the parameters only apply to the people picker control but you can use them when implementing them with your own control. I will try to explain each.

AllowEmailAddresses: This is for the people picker control  and allows valid email addresses to be resolved and used as values. It has no effect on the search.

AllowMultipleEntities: This for the people picker control and allows for entering multiple users or groups. It has no effect on the search.


AllUrlZones: Only affects the search if you have set the WebApplicationID. It search across all UrlZones for that particular web application.


MaximumEntitySuggestions: Basically a row limit of how many users or groups are returned.


PrincipalSource: What sources you wish to search. Choices are  All - 15 , Membership Provider - 4 , RoleProvider - 8, UserInfoList - 1  or Windows - 2. These values can be combined.


PrincipalType: Controls the type of entities that are returned in the results. Choices are All - 15, Distribution List - 2 , Security Groups - 4,  SharePoint Groups – 8, User – 1. These values can be combined.


QueryString: The term to search


Required: This is for the people picker control and makes the field required. It has no effect on the search


SharePointGroupID: An integer representing the group ID you want to limit your search to. Only works if you set the Web parameter also which cannot be done via REST.


UrlZone: Limits the search to certain zones within the web application. Can only be used if the UrlZoneSpecified  parameter is set to true. Choices are Custom - 3, Default - 0, Extranet - 4, Internet – 2, IntraNet – 1. These values can be combined.


UrlZoneSpecified: Sets whether you are limiting your search to a particular URL zone in the web application.


Web: If set it works in conjunction with the SharePointGroupID parameter.


WebApplicaitonID: String value representing the Guid of the web application you want to limit your search to.


Easy PeoplePicker Functionality Using REST


Using the SharePoint REST API makes it easy to implement people picking. No need to struggle with the loading of dependent JavaScript files and you get better control over the behavior of the people searching. Finally you can easily use one function to service as many html inputs as you want.

Microsoft SharePoint Server MVP 2014

$
0
0
Technorati Tags: ,

I was very happy to find out earlier this month that I was awarded my 6th Microsoft SharePoint MVP award. It is an honor to be included with such a passionate group of people. I never get tired of hearing about the perseverance, curiosity and commitment of the SharePoint community to help others understand and excel at using the SharePoint platform. Many successful businesses have been built on top of SharePoint and even with the shift to O365 many more will be built. To me its all about learning, understanding and improving. I like putting the MVP awards next to my favorite poster of Steve Prefontaine’s quote “To give anything less than your best is to sacrifice the gift”. I like this picture because sometimes it feels like a race to stay ahead of all the changes. You also need endurance to overcome the frustration of software development. But most of all its the feeling of exhilaration when you have created something that works well. The people in the SharePoint community are giving their best, day in and day out.

Uploading Large Documents into SharePoint Online with REST,CSOM, and RPC using C#

$
0
0
Technorati Tags: ,,

There are many articles that give great examples on how to upload documents to SharePoint Online using jQuery and REST. These are useful to get around the message size limitation of use CSOM/JSOM when uploading documents. This message size limitation is not configurable in SharePoint Online. There are few examples on how to upload large documents using C#. In this blog post I will show you how to use C# and the SharePoint REST, Managed CSOM and RPC to upload large documents (up to 2GB) to SharePoint Online. There are a few things you need to take care of to get all these  to work with SharePoint Online.

Credentials and Cookie Containers

In the code examples below both REST and RPC use the HttpWebRequest class to communicate with SharePoint. When using this class from C# you must set the Credentials and the CookieContainer properties of the HttpWebRequest object. The following helper methods creates the Microsoft.SharePoint.Client.SharePointOnlineCredentials and gets the System.Net.CookieContainer for the SharePointOnlineCredentials.

public static class Utils
{

public static CookieContainer GetO365CookieContainer(SharePointOnlineCredentials credentials, string targetSiteUrl)
{

Uri targetSite = new Uri(targetSiteUrl);
string cookieString = credentials.GetAuthenticationCookie(targetSite);
CookieContainer container = new CookieContainer();
string trimmedCookie = cookieString.TrimStart("SPOIDCRL=".ToCharArray());
container.Add(new Cookie("FedAuth", trimmedCookie, string.Empty, targetSite.Authority));
return container;


}

public static SharePointOnlineCredentials GetO365Credentials(string userName, string passWord)
{
SecureString securePassWord = new SecureString();
foreach (char c in passWord.ToCharArray()) securePassWord.AppendChar(c);
SharePointOnlineCredentials credentials = new SharePointOnlineCredentials(userName, securePassWord);
return credentials;
}


}

Uploading Large Documents With REST


The following code takes the site URL, document library title, and a file path to a local file and adds the file to the root folder collection of the site. If you want to use folders you can modify this code to handle it. The REST call requires a form digest value to be set so I have included the code that makes a REST call to the contextinfo to get it. Please make sure to set the time out on the HttpWebRequest to about 10 minutes because large files will exceed the default time out of 100 seconds. 10 minutes should be adequate to cover the unpredictable upload speeds of ISP’s and SharePoint Online.

public static void UploadRest(string siteUrl, string libraryName, string filePath)
{
byte[] binary = IO.File.ReadAllBytes(filePath); ;
string fname = IO.Path.GetFileName(filePath);
string result = string.Empty;
string resourceUrl = siteUrl + "/_api/web/lists/getbytitle('" + libraryName + "')/rootfolder/files/add(url='" + fname + "',overwrite=true)";

HttpWebRequest wreq = HttpWebRequest.Create(resourceUrl) as HttpWebRequest;
wreq.UseDefaultCredentials = false;
SharePointOnlineCredentials credentials = Utils.GetO365Credentials("your login", "your password");
wreq.Credentials = credentials;
wreq.CookieContainer = Utils.GetO365CookieContainer(credentials, siteUrl);

string formDigest = GetFormDigest(siteUrl, credentials, wreq.CookieContainer);
wreq.Headers.Add("X-RequestDigest", formDigest);
wreq.Method = "POST";
wreq.Timeout = 1000000;
wreq.Accept = "application/json; odata=verbose";
wreq.ContentLength = binary.Length;


using (IO.Stream requestStream = wreq.GetRequestStream())
{
requestStream.Write(binary, 0, binary.Length);
}

WebResponse wresp = wreq.GetResponse();
using (IO.StreamReader sr = new IO.StreamReader(wresp.GetResponseStream()))
{
result = sr.ReadToEnd();
}


}
public static string GetFormDigest(string siteUrl, ICredentials credentials, CookieContainer cc)
{
string formDigest = null;

string resourceUrl = siteUrl +"/_api/contextinfo";
HttpWebRequest wreq = HttpWebRequest.Create(resourceUrl) as HttpWebRequest;

wreq.Credentials = credentials;
wreq.CookieContainer = cc;
wreq.Method = "POST";
wreq.Accept = "application/json;odata=verbose";
wreq.ContentLength = 0;
wreq.ContentType = "application/json";
string result;
WebResponse wresp = wreq.GetResponse();

using (IO.StreamReader sr = new IO.StreamReader(wresp.GetResponseStream()))
{
result = sr.ReadToEnd();
}

var jss = new JavaScriptSerializer();
var val = jss.Deserialize>(result);
var d = val["d"] as Dictionary;
var wi = d["GetContextWebInformation"] as Dictionary;
formDigest = wi["FormDigestValue"].ToString();

return formDigest;

}

Uploading Large Documents with CSOM


At one time I thought you could not do this with CSOM, however fellow MVP Joris Poelmans brought to my attention that the AMS sample Core.LargeFileUpload was able to upload over 3 mb files O365 Development Patterns and Practices. This can only be done if you are setting the FileCreationInfo ContentStream property with an open stream to the file. This gets around the message size limit of CSOM because the ContentStream is using the MTOM optimizations and sending the raw binary rather than a base64 encoded binary. This is much more efficient and is faster that the other methods. This appears to be a later change in CSOM and optimized for SharePoint Online. The CSOM code does not need a cookie container. I also tried using File.SaveBinaryDirect method but I received “Cannot Invoke HTTP Dav Request” since this is not supported in SharePoint Online.

 public static void UploadDocumentContentStream(string siteUrl, string libraryName, string filePath)
{
ClientContext ctx = new ClientContext(siteUrl);
ctx.RequestTimeout = 1000000;
ctx.Credentials = Utils.GetO365Credentials("your login", "your password");
Web web = ctx.Web;

using (IO.FileStream fs = new IO.FileStream(filePath, IO.FileMode.Open))
{
FileCreationInformation flciNewFile = new FileCreationInformation();

// This is the key difference for the first case - using ContentStream property
flciNewFile.ContentStream = fs;
flciNewFile.Url = IO.Path.GetFileName(filePath);
flciNewFile.Overwrite = true;


List docs = web.Lists.GetByTitle(libraryName);
Microsoft.SharePoint.Client.File uploadFile = docs.RootFolder.Files.Add(flciNewFile);

ctx.Load(uploadFile);
ctx.ExecuteQuery();
}
}

Uploading Large Documents with RPC


RPC still lives and is supported in SharePoint Online. The code below is simplified. RPC can be hard to understand because the syntax for the different parameters is from years ago. RPC is basically an HTTP POST to C++ dll. It can be fast but it was not faster than CSOM.  The parameters and binary must be combined and separated by a line feed into one common byte array before posting. The libraryName parameter cannot be the title of document library but the actual URL for it. Instead of Documents you must use Shared Documents. You will note many of the parameters are URL Encoded because RPC is very particular about characters in the URL. Finally, note that the code feeds the byte array to the request stream in chunks. This helps prevent triggering of SharePoint Online throttling limits.

 public static void UploadDocumentRPC(string siteUrl, string libraryName, string filePath)
{
string method = HttpUtility.UrlEncode("put document:14.0.2.5420");
string serviceName = HttpUtility.UrlEncode(siteUrl);
string document = HttpUtility.UrlEncode(libraryName + "/" + IO.Path.GetFileName(filePath));
string metaInfo = string.Empty;
string putOption = "overwrite";
string keepCheckedOutOption = "false";
string putComment = string.Empty;
string result = string.Empty;

string fpRPCCallStr = "method={0}&service_name={1}&document=[document_name={2};meta_info=[{3}]]&put_option={4}&comment={5}&keep_checked_out={6}";
fpRPCCallStr = String.Format(fpRPCCallStr, method, serviceName, document, metaInfo, putOption, putComment, keepCheckedOutOption);

byte[] fpRPCCall = System.Text.Encoding.UTF8.GetBytes(fpRPCCallStr + "\n");
byte[] postData = IO.File.ReadAllBytes(filePath);
byte[] data;

if (postData != null && postData.Length > 0)
{
data = new byte[fpRPCCall.Length + postData.Length];
fpRPCCall.CopyTo(data, 0);
postData.CopyTo(data, fpRPCCall.Length);
}
else
{
data = new byte[fpRPCCall.Length];
fpRPCCall.CopyTo(data, 0);
}

HttpWebRequest wReq = WebRequest.Create(siteUrl + "/_vti_bin/_vti_aut/author.dll" ) as HttpWebRequest;
SharePointOnlineCredentials credentials = Utils.GetO365Credentials("your login", "your password");
wReq.Credentials = credentials;
wReq.CookieContainer = Utils.GetO365CookieContainer(credentials, siteUrl);
wReq.Method="POST";
wReq.Timeout = 1000000;
wReq.ContentType="application/x-vermeer-urlencoded";
wReq.Headers.Add("X-Vermeer-Content-Type", "application/x-vermeer-urlencoded");
wReq.ContentLength=data.Length;

using (IO.Stream requestStream = wReq.GetRequestStream())
{
int chunkSize = 2097152;
int tailSize;
int chunkNum = Math.DivRem(data.Length, chunkSize, out tailSize);

for (int i = 0; i < chunkNum; i++)
{
requestStream.Write(data, chunkSize * i, chunkSize);
}

if (tailSize > 0)
requestStream.Write(data, chunkSize * chunkNum, tailSize);

}

WebResponse wresp = wReq.GetResponse();
using (IO.StreamReader sr = new IO.StreamReader(wresp.GetResponseStream()))
{
result = sr.ReadToEnd();
}

}

Three Ways of Uploading Large Documents to SharePoint Online


All of the above code examples are good ways to upload large documents to SharePoint Online. All of them utilize the Client Object Model to create the credentials and cookie that is required for SharePoint Online. Getting the cookie is rather complicated without using the Client Object Model. All three methods require that you set the request timeout to a large value because uploading to SharePoint Online is much slower than SharePoint On-Premises. Experiment with the code samples. I tested these with 200mb files and the CSOM was the fastest but your results may vary. I like variety and having multiple ways of accomplishing a task.

Using the HttpClient Class with SharePoint 2013 REST API

$
0
0
Technorati Tags: ,

The System.Net.Http.HttpClient class is new in .Net framework 4.5 and was introduced under the ASP.Net Web API. The class and has many methods that support asynchronous programming and  is the best choice for writing client apps that make HTTP requests. Compared to the traditional System.Net.HttpWebRequest class not only does the HttpClient class have more options it also has extension methods such as PostAsJsonAsync and PostAsXmlAsync  methods which are available in System.Net.Http.Formatting assembly shipped with ASP.Net MVC 4 framework. In this post I am going to give you a tip on how to successfully post to the SharePoint REST API using the HttpClient class. There are many examples on how to post to the SharePoint REST API using the HttpWebRequest class but hardly any using the HttpClient class. If you are not careful you would think that the HttpClient class did not work with the SharePoint REST API.

I Keep Getting a 400 Bad Request Message when Posting

Below is a small example on how to use the HttpClient to create a folder in SharePoint 2013. The key to success is setting the Content-Type header correctly when posting. If you have used the REST API you know you must set the Content-Type header to “application/json; odata=verbose”. If you don’t you will get a“400 Bad Request” error. You can use the HttpClient.DefaultRequestHeaders collection to add headers but when trying to add the “Content-Type” header the collection will throw an “InvalidOperationException” with this message “{"Misused header name. Make sure request headers are used with HttpRequestMessage, response headers with HttpResponseMessage, and content headers with HttpContent objects."}”. So ok I must not be setting the content-type correctly on the HttpContent object. The StringContent class is what you are supposed to use as an argument when calling the HttpClient.PostAsync method. Looking at the StringContent class your first inclination is to use the constructor and give it the json that you want to post. The constructor takes the json, encoding type and media type as arguments. The media type corresponds to the content-type.

StringContent strContent = new StringContent(json, System.Text.Encoding.UTF8, "application/json;odata=verbose");

Unfortunately sending “application/json;odata=verbose” as the media type argument causes a“FormatException” with the message {"The format of value 'application/json;odata=verbose' is invalid."}. If you just use“application/json” you will receive a“400 bad request” error because the “odata=verbose” is missing.  So how do you get around this. First of all you must create the StringContent object with the json as the only argument to the constructor and then set the StringContent.Headers.ContentType property to “application/json;odata=verbose” using the MediaTypeHeaderValue.Parse method.

StringContent strContent = new StringContent(json);               
strContent.Headers.ContentType = MediaTypeHeaderValue.Parse("application/json;odata=verbose");

Mystery solved.

private void CreateFolder(HttpClient client, string digest)
{
client.DefaultRequestHeaders.Clear();
client.DefaultRequestHeaders.Add("Accept", "application/json;odata=verbose");
client.DefaultRequestHeaders.Add("X-RequestDigest", digest);
client.DefaultRequestHeaders.Add("X-HTTP-Method", "POST");

string json = "{'__metadata': { 'type': 'SP.Folder' }, 'ServerRelativeUrl': '/shared documents/folderhttp1'}";
client.DefaultRequestHeaders.Add("ContentLength", json.Length.ToString());
try
{
StringContent strContent = new StringContent(json);
strContent.Headers.ContentType = MediaTypeHeaderValue.Parse("application/json;odata=verbose");
HttpResponseMessage response = client.PostAsync("_api/web/folders", strContent).Result;

response.EnsureSuccessStatusCode();
if (response.IsSuccessStatusCode)
{
var content = response.Content.ReadAsStringAsync();
}
else
{
var content = response.Content.ReadAsStringAsync();
}
}
catch (Exception ex)
{
System.Diagnostics.Debug.WriteLine(ex.Message);
}

}

HttpClient is Here


HttpClient is a modern HTTP client for .NET. It provides a flexible and extensible API for accessing all things exposed through HTTP. You should use it instead of the HttpWebRequest. You can read more about it here System.Net.Http. Another great source of information when using the HttpClient with SharePoint REST is Dennis RedField’s blog Cloud 2013 or Bust. This blog has an in depth 4 part series on how to use the HttpClient with SharePoint REST. Changing our habits as developers can be a slow process. However, some new APIs can be confusing especially when used against SharePoint 2013. SharePoint 2013 is not fully OData compliant yet and has some quirks, namely content-type checking.  I hope this tip can save you some time.

Sharing Documents with the SharePoint REST API

$
0
0
Technorati Tags: ,,

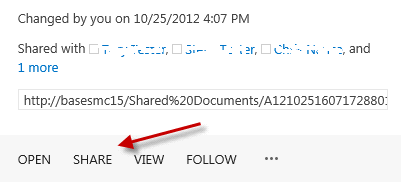
Sharing documents is a pretty basic thing in SharePoint. Most  everyone is familiar with the callout action “Share” which enables you to share a document with other people. It is a mainstay of collaboration when working with documents in a team.

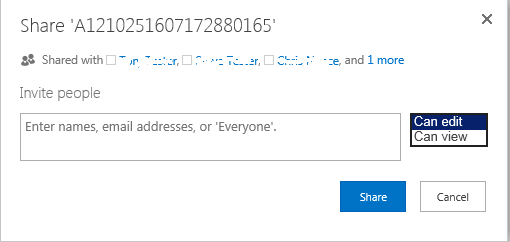
However, there is very little documentation on how to do this through the remote API of SharePoint. In this post I will show how you can do this using the REST API and JavaScript. The call has many arguments which can be confusing. The best description I have found for the UpdateDocumentSharingInformation method is here API Description.  Just remember when you are sharing a document you are granting permissions. If you want to use this REST API method in a SharePoint app, then make sure you grant the “Web Manage” permissions in your app manifest. When you click the Share action you are presented a dialog to grant either view or edit permissions to multiple users or roles.

The Code

Below is the REST call using  JavaScript code that shares a document from a SharePoint hosted app.

function shareDocument()
{
var hostweburl = decodeURIComponent(getQueryStringParameter('SPHostUrl'));
var appweburl = decodeURIComponent(getQueryStringParameter('SPAppWebUrl'));
var restSource = appweburl + "/_api/SP.Sharing.DocumentSharingManager.UpdateDocumentSharingInfo";


$.ajax(
{
'url': restSource,
'method': 'POST',
'data': JSON.stringify({
'resourceAddress': 'http://basesmc15/Shared%20Documents/A1210251607172880165.pdf',
'userRoleAssignments': [{
'__metadata': {
'type': 'SP.Sharing.UserRoleAssignment'
},
'Role': 1,
'UserId': 'Chris Tester'
}],
'validateExistingPermissions': false,
'additiveMode': true,
'sendServerManagedNotification': false,
'customMessage': "Please look at the following document",
'includeAnonymousLinksInNotification': false
}),
'headers': {
'accept': 'application/json;odata=verbose',
'content-type': 'application/json;odata=verbose',
'X-RequestDigest': $('#__REQUESTDIGEST').val()
},
'success': function (data) {
var d = data;
},
'error': function (err) {
alert(JSON.stringify(err));
}
}
);

}

The Parameters


ResourceAddress: This is the full URL to the document you want to share


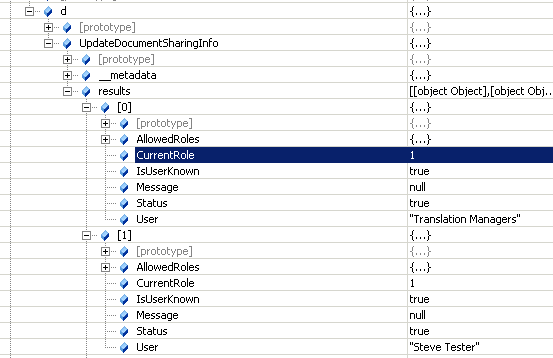
UserRoleAssignments: This an array of users and roles that you want to share the document with. The Role property represents which permission you are assigning. 1 =  View, 2 =  Edit, 3 = Owner, 0 = None. The UserId property can be the name of the user or a role.  For example, if you wanted to share the document with the “Translation Mangers” role and the “Steve Tester” user you would use this JSON:

'userRoleAssignments': [{
'__metadata': {
'type': 'SP.Sharing.UserRoleAssignment'
},
'Role': 1,
'UserId': 'Translation Managers'
},
{
'__metadata': {
'type': 'SP.Sharing.UserRoleAssignment'
},
'Role': 1,
'UserId': 'Steve Tester'
}]

ValidateExistingPermissions: A flag indicating how to honor a requested permission for a user. If this value is "true", SharePoint will not grant the requested permission if a user already has sufficient permissions, and if this value is "false", then SharePoint  will grant the requested permission whether or not a user already has the same or more permissions. This parameter only applies when the additiveMode  parameter is set to true.


AdditiveMode:A flag indicating whether the permission setting uses the additive or strict mode. If this value is "true", the permission setting uses the additive mode, which means that the specified permission will be added to the user’s current list of permissions if it is not there already, and if this value is "false", the permission setting uses the strict mode, which means that the specified permission will replace the user’s current permissions. This parameter is useful when you want to stop sharing a document with a person or group. In this case you would set AdditiveMode to false using the Role = 0.


SendServerManagedNotification: A  flag to indicate whether or not to generate an email notification to each recipient in the userRoleAssignments array after the document update is completed successfully. If this value is "true", then SharePoint will send an email notification if an email server is configured, and if the value is "false", no email notification will be sent.


CustomMessage: A custom message to be sent in the body of the email.


IncludeAnonymousLinksInNotification: A flag that indicates whether or not to include anonymous access links in the email notification to each recipient in the userRoleAssignments array after the document update is completed successfully. If the value is "true", the SharePoint will include an anonymous access link in the email notification, and if the value is "false", no link will be included. This is useful if you are sharing the document with an external user. You must be running this code with full control or as a Site Owner if you want to share the document with external users.


The Results


After calling the above code you will receive a result for every user or role you have shared the document with. The code does not return an error and you must examine the results to determine success. Check the Status property. If this is false typically there will be a message in the Message property explaining the problem. It also tells you whether the user is known. If the user is not known then it is considered an external user.


Resting and Sharing


As you can see there is a lot more to sharing a document versus what is presented in the SharePoint UI. The UpdateDocumentSharingInfo method has many options. You can use this in your custom SharePoint apps to build more robust sharing of documents which could include the option of a custom email message or bulk sharing of documents. This could also be used to stop sharing a document. I have yet to find an easy way to stop sharing a document using the SharePoint UI.


Easy SharePoint App Model Deployment for Web Developers (SPFastDeploy 3.5)

$
0
0
Technorati Tags: ,,,

In March of this year I added support to the SPFastDeploy Visual Studio extension to deploy a file to SharePoint when saving.  SPFastDeploy 3.0 This turned out to be a popular feature. It also supported deploying the JavaScript files generated by the Typescript compiler when saving a Typescript file. In this blog post I will show you where I have added the same support for CoffeeScript and LESS generated files. I have also added support for the Web Essentials minifying on save feature. Finally I will explain the support for deployng linked files in your solution and some minor bug fixes.

SPFastDeploy 3.5 

CoffeeScript and LESS Support

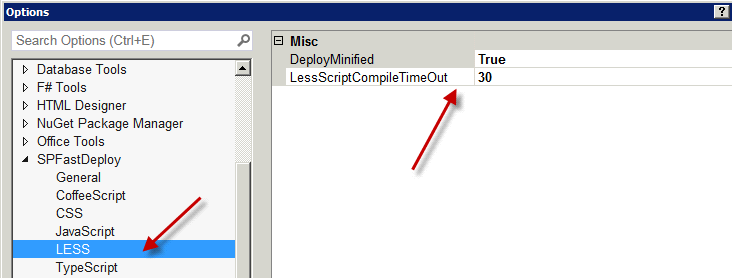
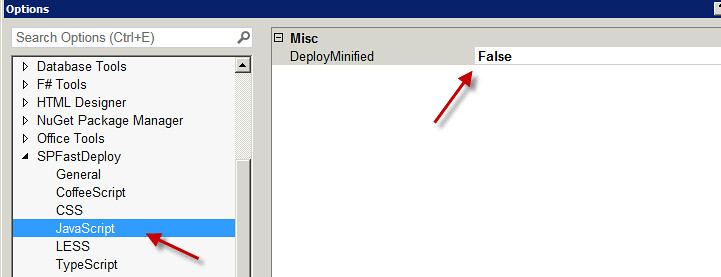
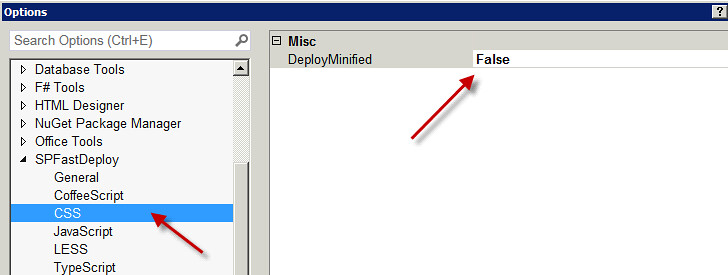
The Visual Studio Web Essentials extension adds many web development tools. These include Typescript, CoffeeScript and LESS languages. These tools compile the code and generate the related  JavaScript and CSS files. SPFastDeploy 3.0 supported deploying the related JavaScript file for Typescript. Version 3.5 supports now supports deploying the related files when saving CoffeeScript and LESS files. The SPFastDeploy extension options have been expanded to include options for each supported language. The category options gives you the ability to define the amount of time to wait and look for the generated related file before timing out. In addition SPFastDeploy  supports Web Essentials ability to minify on save. So if you have generated a minified JavaScript or CSS file and have the Web Essentials feature enabled, then SPFastDeploy will look for the related minified version of the related file. Please note it is up to you to have the minified file generated in the same folder as the corresponding non-minified file. SPFastDeploy only looks for the minified file and does not generate it.

Minify Support

SPFastDeploy 3.5 supports deploying auto minified JavaScript and CSS files not generated by compilers. So if you are just editing and saving JavaScript and CSS files then SPFastDeploy will deploy the minified related file when saving your changes. You will see two new options one for JavaScript and one for CSS. Once again it is up to you generate the minified file in the same folder using Web Essentials. Please note that if you save the file and no changes have been made, then Web Essentials will not generate a new minified file and SPFastDeploy will time out waiting for the new minified file.

Linked File Support

Since Visual Studio 2010 you can add an existing file to a solution by adding a link to that file from another location or solution. SPFastDeploy now supports deploying these types of files when saving from SharePoint app model solutions. Linked files are denoted by the shortcut icon.

Bug Fixes

SPFastDeploy 3.5 fixes the bug where you have loaded a JavaScript or CSS file from outside the project and then save it with the “Deploy On Save” option turned on and Visual Studio crashes. This version also fixes the bug where if you change the Site URL property of the SharePoint app project, then SPFastDeploy is not aware of the change and continues to deploy it to the previous Site URL. Previously you had to restart Visual Studio before SPFastDeploy would pick up the change.

Be More Productive with Web Essentials and SPFastDeploy 3.5

Deploying your changes to a SharePoint App automatically when saving makes SharePoint App Model development easy. Now with SPFastDeploy 3.5 you can take this time saving feature and combine it with the web development tools from Web Essentials saving even more time. If you want support for other web development languages such as SWEET.js or SASS then please put your request in at the SPFastDeploy Q/A section of the Visual Studio extensions home page.

Managing Related Items with the SharePoint REST API

$
0
0
Technorati Tags: ,,,

The “Related Items” column was introduced in SharePoint 2013. It is a site column that is part of the Task content type. The column allows you to link other items to a given task. For example if you are doing an invoice approval workflow you may want to link an image of the invoice to the workflow task. The “Related Items” site column is not available to be added to other content types since it is by default part of the “_Hidden” site column group. Of course you can easily change this as explained in this link Enable Related Items Column allowing you to use it with other content types. The “Related Items” column is not visible in the new or edit form. It can only be accessed in the view form. This is probably due to the fact that the “Related Items” column has an “Invalid” field type and cannot be modified through traditional remote API list item methods. In this post I will show you how to do basic CRUD operations on the related items of a task item using the SharePoint REST API. The code samples are using the HttpClient with managed code. I was going to use JavaScript but the SharePoint Remote API exposes only static methods for these operations which unfortunately cannot be called across domains.   As you read through the post you will be surprised by some of the quirks of the API and what to watch out for.


First get Authenticated

All the code examples for managing related items must send a form digest value. The code below shows an example to get this value via the REST API. You could also factor out all of the code for creating the HttpClient object and send this in as a parameter to all the examples.

public string GetDigest()
{
string url = "http://servername/";
HttpClient client = new HttpClient(new HttpClientHandler() { UseDefaultCredentials = true });
client.BaseAddress = new System.Uri(url);
string retVal = null;
string cmd = "_api/contextinfo";
client.DefaultRequestHeaders.Add("Accept", "application/json;odata=verbose");
client.DefaultRequestHeaders.Add("ContentType", "application/json");
client.DefaultRequestHeaders.Add("ContentLength", "0");

try
{
var response = client.PostAsJsonAsync(cmd, "").Result;

if (response.IsSuccessStatusCode)
{
try
{
string content = response.Content.ReadAsStringAsync().Result;
var jss = new JavaScriptSerializer();
var val = jss.Deserialize>(content);
var d = val["d"] as Dictionary;
var wi = d["GetContextWebInformation"] as Dictionary;
retVal = wi["FormDigestValue"].ToString();

}
catch (Exception ex1)
{
System.Diagnostics.Debug.WriteLine(ex1.Message);

}

}

}
catch (Exception ex)
{
System.Diagnostics.Debug.WriteLine(ex.Message);
}

return retVal;
}

Get a Task’s Related Items


The code below shows how to retrieve the related items for a given task. All of the methods for the SP.RelatedItemManager class are static. Static methods must be called by appending the method name to the class name with a “.” (period) rather than a forward slash. The GetRelatedItems method takes two parameters. The first parameter is the SourceListName. This can be either the name (title) of the list or the ID (GUID) of the list. The code will run faster if you send in a string representing the ID (GUID). The second parameter is the SourceItemID. This is the integer value of the task item’s ID. The server code assumes the source list is in the current web you are making the call from. The method also will return a maximum of 9 related items.

public async void GetRelatedItems(string digest)
{

string url = "http://servername";
HttpClient client = new HttpClient(new HttpClientHandler() { UseDefaultCredentials = true });
client.BaseAddress = new System.Uri(url);
client.DefaultRequestHeaders.Clear();
client.DefaultRequestHeaders.Add("Accept", "application/json;odata=verbose");
client.DefaultRequestHeaders.Add("X-RequestDigest", digest);
client.DefaultRequestHeaders.Add("X-HTTP-Method", "POST");

string json = "{'SourceListName': 'POCreation','SourceItemID': 2}";
client.DefaultRequestHeaders.Add("ContentLength", json.Length.ToString());
try
{
StringContent strContent = new StringContent(json);
strContent.Headers.ContentType = MediaTypeHeaderValue.Parse("application/json;odata=verbose");
HttpResponseMessage response = await client.PostAsync("_api/SP.RelatedItemManager.GetRelatedItems", strContent);

response.EnsureSuccessStatusCode();
if (response.IsSuccessStatusCode)
{
var content = response.Content.ReadAsStringAsync();
}
else
{
var content = response.Content.ReadAsStringAsync();
}
}
catch (Exception ex)
{
System.Diagnostics.Debug.WriteLine(ex.Message);
}

}
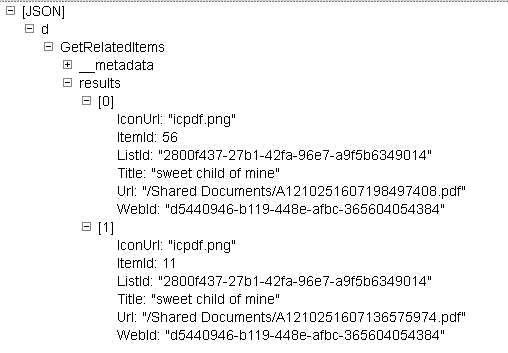
Below is an example of the json response. You can get this json from the response.Content.Result property. The result can be parsed using the Newtonsoft.Json assembly.

Adding a Related Item


When adding a related item to an existing task the API can be confusing. The AddSingleLinkToUrl method takes 4 parameters, SourceListName, SourceItemID, TargetItemUrl, and TryAddReverseLink.  Since I had started experimenting with the AddSingleLinkToUrl first I assumed the source parameters would be the list where the related item was coming from and the target parameters represented the task list I was working with. But of course it is the opposite. Just like in the GetRelatedItems method you can use either the list name or ID (GUID) for the SourceListName. The SourceItemID is the ID of the task list item. The TargetItemUrl is the server relative URL of the item you are adding as a related item. In the code below I am using a document from the Shared Documents library. The final parameter TryAddReverseLink is very interesting and this value is set to true when adding related items using the SharePoint UI. When you set this to true the server side code will check to see if the target list also has a “Related Items” field. If it does then the code will add a json value of the source task item to the target item’s “Related Items” field, thus creating a link between the two items. This does not raise an error if the target list does not have a “Related Items” field. Finally, a few things to be aware of. You will receive an error if the target URL is the URL to the task item itself. So you cannot relate to yourself. Secondly, if the source item already has 9 related items then the server code will try and remove any of the 9 that no longer exist and then add the one your adding. If it cannot remove any of the existing 9 an error is returned.

public async void AddRelatedItem(string digest)
{
string url = "http://servername/";
HttpClient client = new HttpClient(new HttpClientHandler() { UseDefaultCredentials = true });
client.BaseAddress = new System.Uri(url);
client.DefaultRequestHeaders.Clear();
client.DefaultRequestHeaders.Add("Accept", "application/json;odata=verbose");
client.DefaultRequestHeaders.Add("X-RequestDigest", digest);
client.DefaultRequestHeaders.Add("X-HTTP-Method", "POST");

string json = "{'SourceListName':'POCreation','SourceItemID':2,'TargetItemUrl':'/Shared Documents/A1210251607175080419.pdf','TryAddReverseLink':true}";
client.DefaultRequestHeaders.Add("ContentLength", json.Length.ToString());
try
{
StringContent strContent = new StringContent(json);
strContent.Headers.ContentType = MediaTypeHeaderValue.Parse("application/json;odata=verbose");
HttpResponseMessage response = await client.PostAsync("_api/SP.RelatedItemManager.AddSingleLinkToUrl", strContent);


response.EnsureSuccessStatusCode();
if (response.IsSuccessStatusCode)
{
var content = response.Content.ReadAsStringAsync();
}
else
{
var content = response.Content.ReadAsStringAsync();
}
}
catch (Exception ex)
{
System.Diagnostics.Debug.WriteLine(ex.Message);
}

}

Removing a Related Item


The DeleteSingleLink method API has 7 parameters. It is more complicated versus adding a related item. Once again you have the SourceListName and SourceItemID parameters. But now you have two more parameters SourceWebUrl and TargetWebUrl.  These can be null if both webs are in the same web where the call is being made. If not then they can be set to either an absolute or relative URL. This method also requires the TargetListName and TargetItemID parameters which are handled the same way as the source parameters. The final parameter will try and remove the reverse link that may have been created when you added the related item. So it is good idea to set this to true since you do not want to leave any dead end relationships.

public async void DeleteRelatedItem(string digest)
{
string url = "http://servername/";
HttpClient client = new HttpClient(new HttpClientHandler() { UseDefaultCredentials = true });
client.BaseAddress = new System.Uri(url);
client.DefaultRequestHeaders.Clear();
client.DefaultRequestHeaders.Add("Accept", "application/json;odata=verbose");
client.DefaultRequestHeaders.Add("X-RequestDigest", digest);
client.DefaultRequestHeaders.Add("X-HTTP-Method", "POST");

string json = "{'SourceListName':'POCreation','SourceItemID':2,'SourceWebUrl':null,'TargetListName':'Documents','TargetItemID':36,'TargetWebUrl':null,'TryDeleteReverseLink':true}";

client.DefaultRequestHeaders.Add("ContentLength", json.Length.ToString());
try
{
StringContent strContent = new StringContent(json);
strContent.Headers.ContentType = MediaTypeHeaderValue.Parse("application/json;odata=verbose");
HttpResponseMessage response = await client.PostAsync("_api/SP.RelatedItemManager.DeleteSingleLink", strContent);


response.EnsureSuccessStatusCode();
if (response.IsSuccessStatusCode)
{
var content = response.Content.ReadAsStringAsync();
}
else
{
var content = response.Content.ReadAsStringAsync();
}
}
catch (Exception ex)
{
System.Diagnostics.Debug.WriteLine(ex.Message);
}

}

Building Better Relationships


There are other methods available on the SP.RelatedItemManager class such as GetPageOneRealtedItems. This basically is the same as calling the GetRelatedItems method but only returns the first 4 items. This method is used from the SharePoint UI. The UI will then call GetRelatedItems when you click the “Show More” link. Another available method similar to AddSingleLinkToUrl is AddSingleLinkFromUrl. The difference between the two is the assumption of which SPWeb you are making the call from. AddSingleLinkToUrl assumes the current web is the web where the source list is located, and the AddSingleLinkFromUrl method assumes the current web is the web where the target list is located. So depending where you are making the call from determines which method to call. It is possible to create a context menu item allowing users to make a document a related item of task. If you are not sure where the code will be hosted you can just use the AddSingleLink method. Similar to the DeleteSingleLink method you must supply more parameters which include the web ids of both the source and target. This allows the server code to relate items across webs. If you want more information on these methods then I recommend you get the SPRemoteAPIExplorer Visual Studio extension.


Are these relationships useful? I think so. It allows users to tie together task items with relevant documents located somewhere else. It decouples task data from documents allowing for different projects/tasks to work with the same documents. It may possibly be used by Microsoft’s new Delve to relate items. You can retrieve the related items value in search results by mapping the ows_relateditems crawled property to a managed property. The value is stored in json format. You could search the managed property for an item by using the value “ItemID:20”. This would return all items that are related to an item with a list item ID of 20. But to be exact you would have to search for “{ItemId:20”, “WebId:”d2a04afc-9a05-48c8-a7fa-fa98f9496141”,”ListId”:”e5a04afc-9a05-48c8-a7fa-fa98f9496897”}”. This would be difficult for end users.


I hope you found this post useful. Knowing how to relate items programmatically can make your workflows much more powerful.  There is still much more to be discovered in the SharePoint Remote API, and there is still much more improvement needed.

SharePoint REST API Batching Made Easy

$
0
0
Technorati Tags: ,,

Well the ability to batch SharePoint REST API requests has finally been made available on Office 365.  This has been long awaited in order to bring the SharePoint REST API close to the OData specification. In addition it was needed to help developers who preferred to use REST over JSOM/CSOM write more efficient less “chatty” code. The REST API had no ability to take multiple requests and submit them in one network request. Andrew Connell has a great post  SharePoint REST API Batching explaining how to use the $Batch endpoint. Using the new $Batch endpoint is not easy.  Even though the capability follows closely the OData specification for batching, it does not mean it is easy to use for developers.  In order to make successful batch requests you must adhere to certain rules. Most of these rules revolve around making sure the multiple endpoint’s, JSON payloads and request headers are placed in the correct position and wrapped with change set and batch delimiters.  The slightest deviation from the rules can result in an unintelligible response leaving a developer wondering whether any of his requests were successful. However, the most difficult part of REST batch requesting was what to do with the results. Even if you were successful at concatenating  your request together, trying to tie the request with the result seemed impossible. The OData specification states that it would be nice if the back end service sent a response that contained the same change set ID as the request, but it is not required.

I love the SharePoint REST API. To me there is something more simpler about using an endpoint instead of creating multiple objects to do the same thing. What to do? In this post I will show you a new JavaScript library I created to make it simple to take your REST requests and put them into one batch request. The library also makes it easy to access the results from the multiple requests. I have tested the library only within a O365 hosted application.

Using the RestBatchExecutor

The RestBatchExecutor library can be found here RestBatchExecutor GitHub.  The RestBatchExecutor encapsulates all the complexity of wrapping your REST requests into one change set and batch. First create a new RestBatchExecutor. The constructor requires the O365 application web URL and an authentication header. The URL will be used to construct the $Batch endpoint where the requests will be submitted. The authentication header in the form of a JSON object allows for you to either use the formDigest or the OAuth token.

var batchExecutor = new RestBatchExecutor(appweburl, { 'X-RequestDigest': $('#__REQUESTDIGEST').val() });

The next step is to create a new BatchRequest for each request to be batched. Set the BatchRequest’s endpoint property to your REST endpoint. Second set the payload property to any JSON object you want to send with your request, this is typically what you would put in the data property of an JQuery $ajax request.  Third, set the verb property. The verb property represents the HTTP request you typically use. For example, if you are updating a list item then use the verb MERGE. This is always set using the “X-HTTP-Method” header. However this verb must be used at the beginning of your endpoint when submitting requests to $Batch. Other verbs would be POST,PUT,DELETE. Finally you can optionally set the headers property. In the case of a DELETE, MERGE or PUT you should set your “If-Match” header to either the etag of the entity or an “*”.  The headers also allows you to take advantage of JSON Light by setting the “accept” header to “application/json;odata=nometadata” for example.


The example below shows three defined endpoints and the creation of three batch requests, representing a list item creation, update and retrieval of the list. After creating a BatchRequest you will need to add it to the RestBatchExecutor using either the loadChangeRequest or loadRequest method. The loadChangeRequest should only be used to add requests that use the POST,DELETE,MERGE or PUT verbs. This makes sure all your write requests are sent in one change request. Use the loadRequest method when doing any type of GET requests. always save the unique token that is returned by both these methods. This token will be used to access the results. In the example I assign the token to an array along with a title for the operation.

var createEndPoint = appweburl
+ "/_api/SP.AppContextSite(@target)/web/lists/getbytitle('coolwork')/items?@target='" + hostweburl + "'";

var updateEndPoint = appweburl
+ "/_api/SP.AppContextSite(@target)/web/lists/getbytitle('coolwork')/items(134)?@target='" + hostweburl + "'";

var getEndPoint = appweburl
+ "/_api/SP.AppContextSite(@target)/web/lists/getbytitle('coolwork')/items?@target='" + hostweburl + "'&$orderby=Title";

var commands = [];

batchRequest = new BatchRequest();
batchRequest.endpoint = createEndPoint;
batchRequest.payload = { '__metadata': { 'type': 'SP.Data.CoolworkListItem' }, 'Title': 'SharePoint REST' };
batchRequest.verb = "POST"
commands.push({ id: batchExecutor.loadChangeRequest(batchRequest), title: 'Rest Batch Create' });

var batchRequest = new BatchRequest();
batchRequest.endpoint = updateEndPoint;
batchRequest.payload = { '__metadata': { 'type': 'SP.Data.CoolworkListItem' }, 'Title': 'O365 REST' };
batchRequest.headers = { 'IF-MATCH': "*" };
batchRequest.verb = "MERGE";
commands.push({ id: batchExecutor.loadChangeRequest(batchRequest), title: 'Rest Batch Update' });

batchRequest = new BatchRequest();
batchRequest.endpoint = getEndPoint;
batchRequest.headers = { 'accept': 'application/json;odata=nometadata' }
commands.push({ id: batchExecutor.loadRequest(batchRequest), title: "Rest Batch Get Items" });

Executing and Getting Batch Results


So now you created and loaded your requests lets submit the request and get the results.  The example below uses the RestBatchExecutor’s executeAsync method. This method takes an optional JSON argument of {crossdomain:true} which tells the method to use either the SP.RequestExecutor for cross domain requests or just use the default JQuery $ajax method. The method returns a promise. When the promise returns you can use the saved request tokens to pull the RestBatchResult from the array. The array contains objects that have their id property set to the result token and it’s result property set to a RestBatchResult. The RestBatchResult has two properties. The status property which is the returned HTTP status, for example, 201 for a successful creation or a 204 for a successful merge. It is up you to interpret the codes. The result property contains the result of the request, if any. A deletion does not return anything for example. However other requests return JSON or XML depending on what the accept header is set to. The code will try to parse the returned string into JSON. If the request returns an error the result will contain the JSON for that. This example basically loops through the results and the saved result tokens and displays a message along with the returned status.

batchExecutor.executeAsync().done(function (result) {
var d = result;
var msg = [];
$.each(result, function (k, v) {
var command = $.grep(commands, function (command) {
return v.id === command.id;
});
if (command.length) {
msg.push("Command--" + command[0].title + "--" + v.result.status);
}
});

alert(msg.join('\r\n'));

}).fail(function (err) {
alert(JSON.stringify(err));
});


How Easy is Rest Batching with the RestBatchExecutor?


So what are some of the things that are easier with the RestBatchExecutor? No more chaining functions and promises together. Your code can be more simpler now. The RestBatchExecutor allows you to write code similar to JSOM by loading requests and then executing one request. The example below shows a loop that creates multiple delete requests and then executes one request.

var batchExecutor = new RestBatchExecutor(appweburl, { 'X-RequestDigest': $('#__REQUESTDIGEST').val() });
var commands = [];
var batchRequest;
for (x = 100; x <= 133; x++) {
batchRequest = new BatchRequest();
batchRequest.endpoint = updateEndPoint.replace("{0}", x);
batchRequest.headers = { 'IF-MATCH': "*" };
batchRequest.verb = "DELETE";
commands.push({ id: batchExecutor.loadChangeRequest(batchRequest), title: 'update id=' + x });
}

The combinations of things you can do with REST batching are interesting. For example you could create a new list, write new items to it, then execute a search. It appears you can load any combination of valid REST endpoints and execute them within a batch.


The Future of REST Batching


More work needs to be done. The REST Batching does not support the OData specification for failure within a change set. If one fails the others still are executed and/or not rolled back. I am sure it will be long time before we see this capability given the complexity of its implementation. Secondly, there seems to be a hard coded throttling limit of 15 requests within the batch. I found this when testing the code above. That limit is too low for developers doing heavier data work. Even JSOM/CSOM has a higher limit of 30 actions per request. Maybe the RestBatchExecutor could add a ExecuteQueryWithExponentialRetry similar to CSOM. Finally, the Batch capability needs to be implemented on SharePoint on-premises.


The RestBatchExecutor is available on GitHub. It still needs more work. If you have suggestions please feel free to contribute.

Easy SharePoint App Model Deployment for SASS Developers (SPFastDeploy 3.5.1)

$
0
0
Technorati Tags: ,,,,

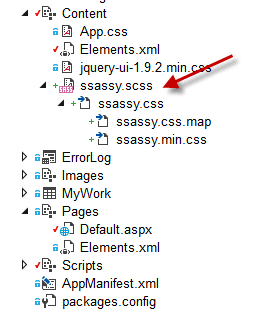
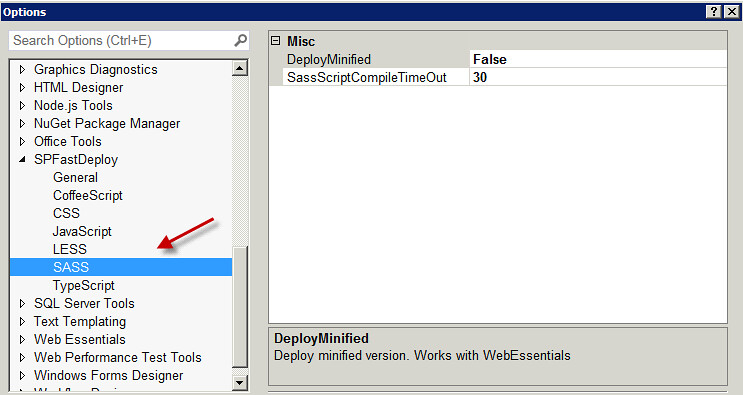
Last October I added support to the SPFastDeploy Visual Studio extension to deploy a file to SharePoint while saving CoffeeScript and LESS files. In the latest release I have added support for SASS(Syntactically Awesome Style Sheets) developers. There has seemed to be a growing interest for SharePoint  developers and designers to use SASS. Visual Studio along with the Web Essentials extension supports compiling SCSS files and generating CSS when saving. The SPFastDeploy extension will automatically deploy the CSS file generated to the SharePoint hosted application.


It will also support deploying the minified CSS file if that option is selected in Web Essentials and you select the DeployMinified option in the SPFastDeploy options.

Finally I have added cross domain support. When you are doing SharePoint app model development on a different domain than the domain you are deploying to, SPFastDeploy will prompt you for credentials. This is similar to what Visual Studio does when selecting the “Deploy Solution” menu item. You will only have to enter your credentials once per Visual Studio session.

So now CSS with superpowers can also be easily customized and tested using SPFastDeploy. Make a change and hit the save button. Refresh your browser and see your style change. CSS can actually be fun again.  Doing remote SharePoint app model development no problem either. Enjoy!

Easy debugging TypeScript and CoffeeScript in Sharepoint Apps with SPFastDeploy 3.6

$
0
0
Technorati Tags: ,,,,

SPFastDeploy 3.6

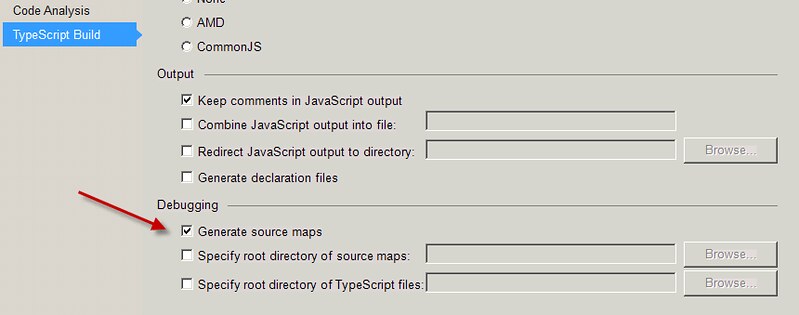
If you have been developing SharePoint hosted apps for a while then you may be using TypeScript or CoffeeScript to generate the JavaScript code. You can debug the generated JavaScript in the browser but it is hard to determine where in the TypeScript the error is occurring. Now with source mapping you can link the JavaScript to the TypeScript and step through the code. This makes it easier to figure out exactly where the code is breaking. Enhance your JavaScript debugging life. If you have included TypeScript in your Visual Studio project you can check to make sure you are generating the source map for the TypeScript using the project’s TypeScript Build settings.

SPFastDeploy makes it easy to step through TypeScript

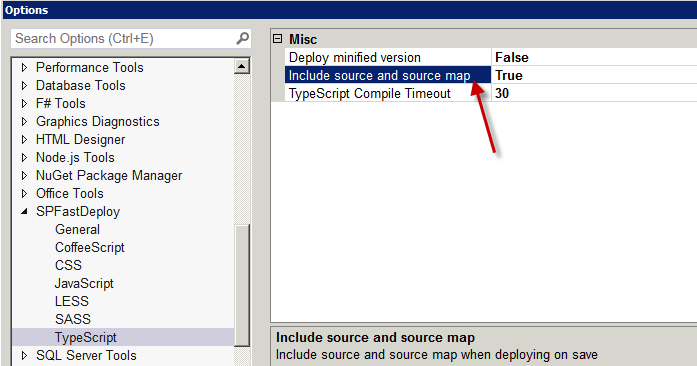
SPFastDeploy has the feature to automatically deploy your code changes to a SharePoint app web when saving. This feature deploys the JavaScript that is generated when using TypeScript or CoffeeScript. However, in order to step through your TypeScript code you must also deploy the corresponding source map and TypeScript files. Version 3.6 now has the option to deploy all three files (JavaScript, source map and TypeScript) when saving. Just set the “Include source and source map” option to true.

Now when you save your changes SPFastDeploy will wait for the TypeScript to compile and generate the JavaScript. It will then look for the corresponding source map and Typescript file and deploy all three files to the SharePoint App.

SPFastDeploy only supports deploying source maps files when it is located in the same directory as the source file. You can now refresh your browser making sure the cache is cleared and start stepping through your changes in TypeScript.

Increase your SharePoint development productivity with SPFastDeploy 3.6 and TypeScript

With this release you can now get the benefits of immediately deploying your code changes when saving and the ability to step through your TypeScript code. Previous versions did not support deploying source map and TypeScript files. Now one click can deploy all three. Also, this release will enable you to right click source map and TypeSript files in the solution explorer and deploy them to your SharePoint App site. Finally, remember all the support for TypeScript is available for CoffeeScript. Thanks to Mikael Svenson for asking for this feature.

SharePoint Search, Azure Search and ElasticSearch

$
0
0
Technorati Tags: ,,,,

In the past six months I have been developing solutions using SharePoint, Azure and ElasticSearch. I wanted to write a post doing a brief comparison between the three search technologies. I also want to voice my concerns and hopes regarding the direction of SharePoint search. Microsoft has created Azure Search which is an abstraction running on top of ElasticSearch. Azure Search is still only in preview however it seems to be Microsoft’s focus for searching in the Cloud. The question is why was the focus not to use SharePoint search? In this post I will try to give you some reasons and why I think SharePoint search needs to incorporate some of the great features you see in ElasticSearch.

What is Unstructured Data?

Application data is seldom just a simple list of keys and values. Typically it is a complex data structure that may contain dates, geo locations, other objects, or arrays of values.

One of these days your going to want to store this data in SharePoint, can you say InfoPath? Trying to do this with SharePoint is the equivalent of trying to squeeze your rich, expressive objects into a very big spreadsheet: you have to flatten the object to fit the document library schema—usually one field per column—basically you lose all the expressive and relational data that your business needs.

Application data can be stored as JavaScript Object Notation, or JSON, as the serialization format for documents. JSON serialization is supported by most programming languages, and has become the standard format used by the NoSQL movement. It is simple, concise, and easy to read.

Consider this JSON document, which represents an invoice:

{
                  "vendorname": "Metal Container",
                  "items": [
                     {
                        "productdesc": "50 gal cannister",
                        "productid": 1256,
                        "productuom": "ea",
                        "quantity": 12,
                        "price": 25
                     },
                     {
                        "productdesc": "25 gal drum",
                        "productid": 1257,
                        "productuom": "ea",
                        "quantity": 12,
                        "price": 10
                     }
                  ],
                  "discountamt": 5,
                  "discountdate": "2014-02-28T00:00:00",
                  "vendor": 1600,
                  "duedate": "2014-03-31T00:00:00",
                  "invoicetotal": 420,
                  "invoicenumber": 2569
  }

This invoice object is complex, however the structure and meaning of the object has been retained in the JSON. Azure Search and ElasticSearch are document oriented, meaning that they store entire objects or documents. They also index the contents of each document in order to make them searchable. Document oriented searching  indexes, searches, sorts, and filters documents on the whole object not just on key value pairs. This is a fundamentally different way of thinking about data and is one of the reasons document oriented search can perform complex searches.

A Comparison of Searches


Above is a table listing a few features to compare the search technologies. Granted these are just a few and there are many other factors to compare. All of the features except for “Index Unstructured Data” are features focused on by search consumers.


SharePoint Search


SharePoint has a limit of 100 million indexed items per search service application. However, SharePoint’s strength is in crawling and indexing binary data. The other two do not come close to matching SharePoint’s capabilities. SharePoint has an extendable infrastructure which allows you to add your own custom content filtering and enrichment. SharePoint search out of the box can crawl many different types of file stores making it easy to get up an running. SharePoint’s query language (KQL) is rich enough to allow more knowledgeable developers to create some informative search experiences for users. SharePoint search has a huge advantage over Azure and ElasticSearch when it comes to security trimming search results. SharePoint can trim results to the item level using access control lists associated with the document. SharePoint even has the ability to customize security trimming with a post security interface you can implement.


Keyword Query Language (KQL) syntax reference


Azure Search


According to preliminary documentation one single Azure dedicated search service is limited to indexing 180 million items. This is based on 15 million items per partition with a maximum of 12 partitions per service. As with SharePoint you could increase the number of total items if you created more search services. Azure search does not support crawling and indexing binary data. It is up to you to push or pull the document data into the index. You can push data into the index with with the Azure Search easy to use API in either REST or .NET. Azure Search also supports pulling the data through it’s built in Indexers that support Azure DocumentDB , Azure SQL or Azure hosted SQL. An Azure indexer can be scheduled to periodically run and sync changes with the index. This is very similar to a SharePoint crawl except Azure indexers do not index binary data such as images. Full-Text searching of document object fields is supported. Azure search supports authentication except not on a user level but through an api-key passed through an HTTP header. Theoretically you can control user access through the OData $filter command in the API. Azure has its own query language which uses the basic operators such as ge, ne, gt, lt. It does have some geospatial functions for distance searching.


Azure OData Expression Syntax for Azure Search


Just remember that Azure Search is an abstraction layer that runs on top of ElasticSearch.


ElasticSearch


ElasticSearch is an open source java based free search product that runs on top of Lucene. Lucene search has been around for a while but it is very complex. ElasticSearch is a product that mixes analytics with search and can create some very powerful insights into your index. It can index an unlimited number of items just as long as you have the servers to support it. Horizontally scaling your search could not be easier. This is why it was chosen by Microsoft to be used in Azure. It does not support crawling. It supports pushing data into the index via an easy to use REST API. It also supports pulling data using a pluggable “river” API.  Rivers can be plugged in for popular NoSQL databases such as CouchDB and MongoDB. Unfortunately, rivers are now deprecated in version 1.5. However, you should be able to obtain comparable “LogStash” services which will push the data changes into the index. Azure Search more than likely is using LogStash to push data into their own instances of ElasticSearch. Security trimming is limited in ElasticSearch. It supports roles that can be synced with LDAP or AD via the “Shield” product. However, these roles do not offer item level security trimming like SharePoint does. The roles are typically used to limit access to certain indexes. ElasticSearch does support full-text searching of binary data such as images. I successfully achieved this MongoDB and GridFS. However, as with SharePoint storing indexing binary data takes up a lot of storage. ElasticSearch has a full fledged sophisticated query language allowing you to search and compare nested objects within documents all executed through a REST API.


ElasticSearch Query DSL


So What is the Big Deal about Unstructured Data?


Many businesses use SharePoint to store transactional content like forms and images. Through forms processing, complex data can be captured that contains parent and child sectional data. Businesses operate on many types of forms with data being organized on the form for a purpose. For example with an invoice it has child line item details that is important data to a business. If the forms processor can create a JSON object capturing the invoice as an entity, then with a NoSQL repository it can be stored intact. SharePoint on the other hand would force you to store the invoice within two lists, one for the invoice and the other for the line items. From a search perspective you would lose the relationship between the invoice and the invoice’s line items.


Relationships matter when it comes to search. For example account payable departments may use a “three-way matching” payment verification technique to ensure that only authorized purchases are reimbursed, thereby preventing losses due to fraud and carelessness. This technique matches the supplier invoice to the related purchase order by checking what was ordered versus what was billed. This of course would require checking line item detail. Finally, the technique then matches the invoice to a a receiving document ensuring that the quantity received is what was billed.


Having the ability to store the document data as JSON enables business to automate this process using search technologies that index this type of data. SharePoint does not have this ability, Azure Search’s query language currently is not sophisticated enough to do this. However, ElasticSearch’s query language is capable of matching on nested objects in these types of scenarios. Being able to leverage your search to automate a normally labor intensive process can save a business a lot of money.


Search Makes a Difference


Microsoft is moving in the right direction with search. In Azure Microsoft is building services around NoSQL and NoSQL searching. However, the focus is still more about mobility, social and collaboration. These are important, but many businesses run on transactional data such as forms and images. I would like to see SharePoint have the ability to integrate better with Azure DocumentDB and Search, opening up the query language more to enable the rich query features of ElasticSearch. In addition, it is imperative that Microsoft come up with a better forms architecture enabling the use of JSON rather than XML for storage. This would open many opportunities to leverage search such as automating some transactional content management workflows step, building more sophisticated e-discovery cases and intelligent retention policies.
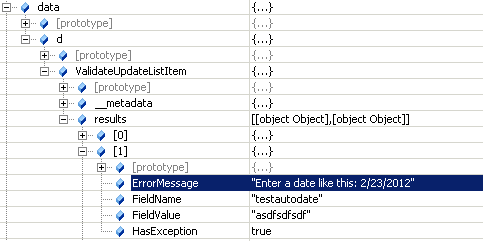
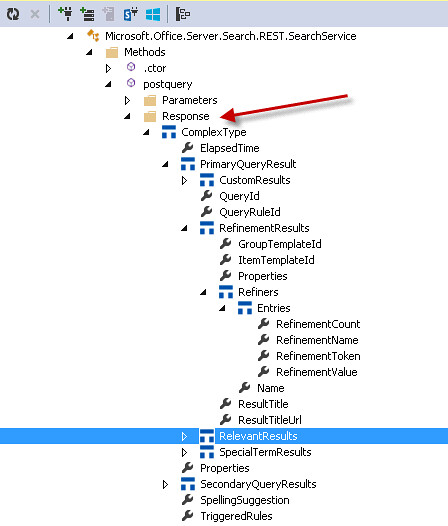
Get a Handle on Your SharePoint Site Closure and Deletion Policies with JavaScript

$
0
0
Technorati Tags: ,,,,

What is great about SharePoint hosted Add-ins (Apps) is that you can come up with some very interesting ideas on how to make people’s life so much more productive. SharePoint has the ability to define s site policy for closing and deleting sites over a period of time. This is great when you are trying to manage many sites and sub sites that tend to proliferate over time. There has been a lot written about how this works and the benefits Overview of Site Policies. In this post I am going to give you some ideas on how you could create a SharePoint hosted Add-in that could help make it easier to view how your policies have been applied. I will also give you an overview on what is available for site policy management with JavaScript.
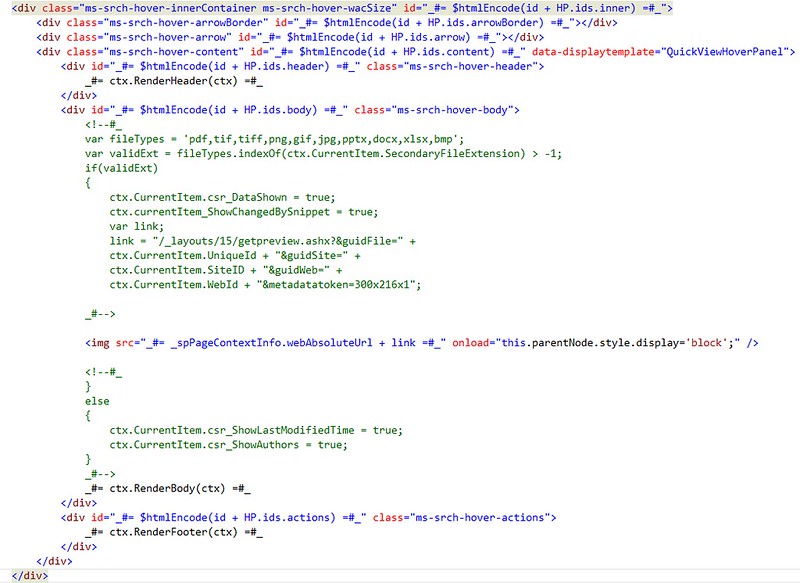
Site Policy and JavaScript

There is some documentation on the .Net managed remote API for managing site policies but of course there is none for JavaScript. You can use the Microsoft.Office.RecordsManagement.InformationPolicy.ProjectPolicy namespace for the .Net managed remote API but you must load the SP.Policy.js file and use the SP.InformationPolicy.ProjectPolicy namespace in JavaScript. Apparently, applying site policies to a web is considered a project. All methods except SavePolicy are static methods. Also, every methods except SavePolicy takes a target SP.Web and the current context as arguments. Unfortunately, none of the methods are callable via the REST interface because the SP.Web is not included in the entity model. Still waiting on this. The following methods are available for managing site policies:

ApplyProjectPolicy: Apply a policy to a target web. This will replace the existing one.

CloseProject: This will close a site. When a site is closed, it is trimmed from places that aggregate open sites to site members such as Outlook, OWA, and Project Server. Members can still access and modify site content until it is automatically or manually deleted.

DoesProjectHavePolicy: This will return true if the target web argument has a policy applied to it.

GetCurrentlyAppliedProjectPolicyOnWeb: Returns the policy currently applied to the target web argument.

GetProjectCloseDate: Returns the date when the target web was closed or will be closed. Returns (System.DateTime.MinValue) if null.

GetProjectExpirationDate: Returns the date when the target web was deleted or will be deleted. Returns (System.DateTime.MinValue) if null.

GetProjectPolicies: Returns the available policies that you can apply to a target web.

IsProjectClosed: Returns true if the target web argument is closed.

OpenProject; Basically the opposite of the CloseProject method.

PostPoneProject: Postpones the closing of the target web if it is not all ready closed.

SavePolicy: Saves the current policy.

When working with policies you have the Name, Description, EmailBody, EmailBodyWithTeamMailBox, and EmailSubject. You can only edit EmailBody, EmailBodyWithTeamMailBox and EmailSubject, and then call SavePolicy. There are no remote methods to create a new ProjectPolicy.

Applying a Site Policy with JavaScript Example

Below is an example of using the JavaScript Object Model to apply a site policy to a SP.Web. The code example is run from a SharePoint hosted Add-in and applies an available site policy to the host web. Of course your Add-in will need full control on the current site collection to do this.

function applyProjectPolicy() {
appweburl = decodeURIComponent(getQueryStringParameter('SPAppWebUrl'));
hostweburl = decodeURIComponent(getQueryStringParameter('SPHostUrl'));
context = SP.ClientContext.get_current();
appContextSite = new SP.AppContextSite(context, hostweburl);
targetWeb = appContextSite.get_web();

policies = SP.InformationPolicy.ProjectPolicy.getProjectPolicies(context, targetWeb);

context.load(policies);
context.executeQueryAsync(function () {
policyEnumerator = policies.getEnumerator();
while (policyEnumerator.moveNext()) {
p = policyEnumerator.get_current();
if (p.get_name() == "test my policy") {
SP.InformationPolicy.ProjectPolicy.applyProjectPolicy(context, targetWeb, p);
context.executeQueryAsync(function () {
alert('applied');
}, function (sender,args) {
alert(args.get_message() + '\n' + args.get_stackTrace());
});
}
}
}, function (sender, args) {
alert(args.get_message() + '\n' + args.get_stackTrace());
});

}

Getting a Better View of Your Policies

When applying a site policy to a target SP.Web all the information is stored in a hidden site collection list with the title of “Project Policy Items List”. Typically you would have to go to each site and click on “Site Settings” and click on “Site Closure and Deletion” to see what policy is applied. This informational page will show you when the site is due to close and/or be deleted. You can also immediately close it or postpone the deletion from this page. Instead of navigating to all these sites to view this information you could navigate the “Project Policy Items List” directly using he URL http://rootsite/ProjectPolicyItemList/AllItems.aspx. The AllItems view can be modified to display all the sites that have policies applied along with the expiration dates and even the number of times the deletion has been postponed.

Of course you probably don’t want to expose this list anywhere in the site collection navigation. You also want to be careful not to modify any of this information since it is used to control the workflows that close and delete sites. Your best bet here is to write a SharePoint Add-in to surface this data where it cannot be inadvertently modified. You can make a rest call to get these items and then load the data into the grid of your choice.

function getProjectPolicyItems() {
appweburl = decodeURIComponent(getQueryStringParameter('SPAppWebUrl'));
hostweburl = decodeURIComponent(getQueryStringParameter('SPHostUrl'));
sourceUrl = appweburl + "/_api/SP.AppContextSite(@target)/web/lists/getbytitle('Project Policy Item List')/items?@target='" + hostweburl + "'";

$.ajax({
'url': sourceUrl,
'method': 'GET',
'headers': {
'accept': 'application/json;odata=verbose'
},
success: function (data) {
d = data;
},
error: function (err) {
alert(JSON.stringify(err));
}
});

}

Creating Value with JavaScript

It is easy to create a SharePoint Add-in to put this data into a custom grid and then have actions to call the SharePoint JSOM to change policies on sites, re-open closed sites, postpone deletion or change the email that is sent out. You could select multiple sites and apply the action once. There are many possibilities to increase productivity. The one thing that is missing from the SharePoint Remote API is having the ability to view site policies settings. These settings are important when you want information about a policy that is applied to the site. You may want to know what type of site policy it is, for example, is it a close and delete policy or just a close policy? Can users postpone the deletion? Is email notification enabled and how often will it be sent? This would be information an administrator would want to quickly view from a SharePoint Add-in. Unfortunately, this information is stored in a property of the ContentType called XmlDocuments which is not available in the SharePoint Remote API. Every time you create a new site policy it creates a new ContentType in the root web of the site collection. All the site policy settings are stored as an xml document in the XmlDocuments property. It would be nice to have this information and especially if could be returned as JSON.

The JSOM and REST SharePoint Remote API still has many sections that are not documented. This is a shame because more and more developers are turning to creating client side Add-ins for their simplicity in deployment and configuration. I hope this post helped you understand what is available in the client side SharePoint Remote API for site policy management. Many times just because it is not listed in MSDN does not mean it is not available. Keep digging!


Get Faster Search Previews in SharePoint Online

$
0
0
Technorati Tags: ,,

Delve was recently released in Office 365 and the experience is bit different than what you may be used to when using SharePoint Online search. The Delve experience can be useful when looking for relevant documents that your colleagues are working on. One of the great features of Delve is the display template it uses to display results. It uses cards showing an image preview with the file icon and the file name. You can add the card to a board, send a link, and view who the document is shared with. The card is somewhat similar to the callout image preview that you would get on certain content types when using SharePoint Online search. The callout image preview in search uses an IFrame and the Office Web Apps server to display office documents and PDF files. The callout is more than a preview and gives you the ability to page through the whole document, print, or even download the document. On the other hand Delve uses a new file handler called getPreview.ashx and only renders a first page image preview without all the extra functionality. This is needed since the preview is displayed inline within the results. Another added benefit of the handler is that it can render image previews for other file formats such as TIF, BMP, PNG and JPG files. In this post I will show you how to incorporate this new file handler into a search display template. The example uses the file handler to display an image within the search callout. However, it is fast and responsive enough to use within the body of your display template if you wish. You can download the templates here: Quick View Display Template

Which Managed Properties to Use?

I downloaded the Item_PDF.html and Item_Hover_PDF.html and renamed them to Item_QuickView.html and Item_QuickView_HoverPanel.html. I then added the UniqueId, SiteID, WebID, SecondaryFileExtension managed properties to each display template. I use the SecondaryFileExtension managed property rather than FileExtension because FileExtension returns DispForm.aspx for documents that are not included in the file types for search to crawl. File types like TIF, BMP, PNG and JPG are not crawled and you have no way to add them in SharePoint Online. The JavaScript in the Item_QuickView_HoverPanel.html uses the SecondaryFileExtension to compare against a valid list of file extensions that the preview handler can process. If it is a valid extension then the code builds a URL to the getPreview.ashx preview handler and sets the Img element’s src attribute to this. That simple.

Fast Viewing of Images

The handler returns images faster than the Office Web Apps server previewer and supports more types of images. The handler does not need an IFrame making it much more lightweight and suitable for using within the body of your search results much like Delve. I tried changing the metadatatoken query string value to see if I could adjust the size returned but it had no effect.

The Benefits of Delve

The new preview handler is a new feature provided by Delve. You can take advantage of it in your search display templates. You can also just use Delve display template if you want. An a great example of this is provided by Mikael Svenson where he created a Delve clone for the Content Search Web Part.

Recognized SharePoint MVP Seven Years Straight

$
0
0
Technorati Tags: ,

I am very thankful to be awarded a seventh straight SharePoint MVP award by Microsoft. It has been a great journey starting all the way back in 2009. I am so glad to be part of a great community that shares it’s expertise and experience with others. Both SharePoint and Office 365 MVP’s dedicate a lot of time to provide others with information that can make them more productive. I have first hand experience knowing that developing for SharePoint and Office 365 can be frustrating and demanding. However, I also know that MVP’s get great satisfaction knowing they solved a problem for someone. Most MVP’s live and breath the technology they are involved in. We know that SharePoint and Office 365 is a great platform for making users productive. We are constantly obsessed with understanding and making the platform better. This is evident by the great number of sources of information that SharePoint and Office 365 MVP’s provide and contribute to. MVP’s produce code examples, best practices, blog posts, forum answers, development tools and great presentations. I love this community because when I need an answer to a technical problem I can usually find it from these resources. I am looking forward to another great year in the SharePoint community.

Using Search as a Rules Engine

$
0
0
Technorati Tags: ,,

I have recently been working on a project where we needed to evaluate the state of an object and depending on the state take certain actions. Seems like a simple coding task to get this done, unless the rules to evaluate state are completely dynamic. An application where rules need to be captured and easily changed typically calls for a rules engine. A rules engine separates business rules from the execution code. Most rules engines require the use of variables along with rules implemented in some framework code. This could be a scripting language or a full fledge programming language like C# or Java. If the rules change usually some code change must take place.

Rules engines are divided into two parts, conditions and actions. Business applications will define conditions and the corresponding actions the application should take given the conditions. The conditions in a rules engine consist of a set of evaluations of the state of an object at any given point of time. I propose that given the capabilities of a search engine it could be used as a rules engine. Conditions in a rules engine can be converted to a query against a particular document (JSON). The query could be stored and used by the rules engine to evaluate the state of a document and then take the associated actions if the document meets the conditions. Leveraging the richness of the query language would increase the capabilities of the rules engine to define very complex rules and possibly make rule processing faster. So what would the required features of a search product be in order for it to function as a rules engine?

Required Features of a Search Based Rules Engine

Index Any Type of Document

The first feature of a search product to function as a rules engine would be the ability to index any type of document. In this case a document would be any valid JSON document. In addition, since application data can be very dynamic a search product with the ability to query any value of that data without the overhead of having to define the schema of the document would be even better.

A Rich Query Domain Specific Language

Application rules can be very complicated and if you are going to use search as a rules engine then the product must have a strong query DSL (Domain Specific Language). The DSL should support the grouping or chaining of queries together to form a true or false condition. The query DSL should also support the turning off of word breaking of string values. Rules typically require exact matches and some search engines word break by default. Finally the query DSL should have the ability to be easily stored and retrieved. This ability is essential since you will want to capture business rules and translate them to query DSL storing them for later execution.

Near Real-Time Indexing

How fast a document is available to be searched after indexing is the most important feature for a search rules engine. Some applications will have data that is changed and must be evaluated immediately. In this case the search product must support real-time indexing where the document is available within one second. In other cases where the data is relatively stagnant it is possible to have higher index latency.

SharePoint Search , Azure Search and Elasticsearch How Do They Stack Up?

SharePoint Search

Unfortunately, SharePoint Search fails on all three features. SharePoint does not have real-time indexing. There is no ability to programmatically  index a document. Secondly it cannot index any type of document. It is limited to whatever IFilters that have been enabled. Finally the query DSL (KQL) is limited. There has been innovation with Delve and the Graph query DSL, however, it is still limited to social and collaboration scenarios.

Azure Search

Azure Search is built on top of Elasticsearch and is strong in all the features except the query DSL. The query DSL remains simple and is geared more towards less robust mobile apps. You can index any type of document however you must define your schema before it can be searched on anything other than it’s ID. You can search on your document within one second of indexing. A great benefit is that all fields are filterable by default, which means they support exact value matching only.

Elasticsearch

ElasticSearch meets all the above feature requirements to be a search rules engine. You can index any document and search on it within one second and not have to define a schema. The ElasticSearch query DSL has an incredible amount of features to support a search rules engine. It has the ability to combine multiple queries into a complex Boolean expression. However, fields are not by default set up to be searched with exact matching. This will require extra index mapping configuration especially if you are wanting to query arrays of child objects.  Finally the query DSL is defined in JSON making it easy to construct, store, and retrieve.

What about NoSQL products like DocumentDB?

NoSQL databases are also an ideal technology for implementing a rules engine. These types of databases can handle large complex documents, however the query DSL for these types of databases can vary and you must trade off between read and write optimizations. With Some NoSQL databases you must do some upfront indexing in order for the data to be immediately available for evaluation.

The Future is JSON Documents

It is becoming much easier to ramp up solutions using JSON documents. The richness and flexibility the format offers makes it easy to integrate multiple data flows into your enterprise solutions. This flexibility along with new search technologies can be combined to implement a fairly robust rules engine to drive some of your workflow applications. Search can play significant role in your applications. Search is not just for finding relevant documents but can be used to supplement or even drive application logic. 

Did you know that SharePoint has a Work Management Service REST API?

$
0
0
Technorati Tags: ,,

There has been a lot written on SharePoint’s Work Management Service and yet it still has many misconceptions by developers about the capabilities of  the API. This powerful SharePoint feature aggregates, synchronizes, and updates tasks from across SharePoint, Exchange, and Project Server. Many developers may not have leveraged this feature since it cannot be called from a SharePoint Add-in. Developers have been left to use the ScriptEditor web part along with the JSOM API. In this post I will show you how you can enable the use of Work Management Service from a SharePoint Add-in on-prem, and how to use the existing REST API.

Enabling Add-in Support for the Work Management Service

In 2013 I created the SPRemoteAPIExplorer Visual Studio Extension (Easy Development with Remote API). This extension documents and makes the SharePoint on-prem remote API discoverable. This blog post explained how SharePoint uses xml files located in 15/config/clientcallable directory to build a cache of metadata of what is allowed in the SharePoint remote API. Each xml file contains the name of the assembly that contains the metadata along with the “SupportAppAuth” attribute which can be set to true or false. If this attribute is set to false then SharePoint will not allow the namespaces for that remote API to be called from an Add-in. In addition, if the namespace you are calling from an Add-in does not have one of these xml files, then you receive a “does not support app authentication” error. Below is the contents of the ProxyLibrary.stsom.xml file which points to the “server stub” assembly for most of the basic SharePoint remote API.


Microsoft.SharePoint.ServerStub, Version=15.0.0.0, Culture=neutral, PublicKeyToken=71e9bce111e9429c

When I was comparing SP2013 with SP2016 I noticed that the work management namespace has a “server stub” assembly but not an xml file in the 15/config/clientcallable directory. So I just created one just like the one in SP2016 called ProxyLibrary.Project.xml pointing to the Work Management server proxy. 

Microsoft.Office.Server.WorkManagement.ServerProxy


I then just did an IIS reset and lo an behold you can now call the Work Management API from a SharePoint Add-In.


So What’s Available in REST?


Once I had added this xml file it was able to be exposed in the SPRemoteAPIExplorer extension. The extension shows all the classes and methods and whether they are available for JSOM, .Net and REST. Now I could see just about everything is available to be called from REST except one important thing … reading tasks! The UserOrderedSession.ReadTasks method takes a TaskQuery argument which cannot be serialized via  JSON. It is very complex type. However, SharePoint does supports some very complex types via REST such as the SearchRequest type for REST searches. So what’s the deal?


The good news is that you can do just about everything else that the JSOM API supports. Below is an example of creating a task with REST.

function testWorkManagmentCreateTask() {
hostweburl = decodeURIComponent(getQueryStringParameter('SPHostUrl'));
appweburl = decodeURIComponent(getQueryStringParameter('SPAppWebUrl'));

var restSource = appweburl + "/_api/SP.WorkManagement.OM.UserOrderedSessionManager/CreateSession/createtask";
$.ajax(
{
'url': restSource,
'method': 'POST',
'data': JSON.stringify({
'taskName': 'test REST create task',
'description': 'cool stuff',
'localizedStartDate': '10/18/2015',
'localizedDueDate': '10/25/2015',
'completed': false,
'pinned': false,
'locationKey': 5,
'editUrl': ''
}),
'headers': {
'accept': 'application/json;odata=verbose',
'content-type': 'application/json;odata=verbose',
'X-RequestDigest': $('#__REQUESTDIGEST').val()
},
'success': function (data) {
var d = data;
},
'error': function (err) {
alert(JSON.stringify(err));
}
}
);

}
Another example here to get the current user's task settings:
function testWorkManagmentREST() {
hostweburl = decodeURIComponent(getQueryStringParameter('SPHostUrl'));
appweburl = decodeURIComponent(getQueryStringParameter('SPAppWebUrl'));
var restSource = appweburl + "/_api/SP.WorkManagement.OM.UserOrderedSessionManager/CreateSession/ReadAllNonTaskData/UserSettings";
$.ajax(
{
'url': restSource,
'method':'POST',
'headers': {
'accept': 'application/json;odata=verbose',
'content-type': 'application/json;odata=verbose',
'X-RequestDigest': $('#__REQUESTDIGEST').val()
},
'success': function (data) {
var d = data;
},
'error': function (err) {
alert(JSON.stringify(err));
}
}
);

}

What is the Future for Work Management REST in SP2016


SP2016 allows the Work Management API to be used from SharePoint Add-ins. Unfortunately, you still can’t read tasks from the REST API. Also, Office 365 still does not allow the API to be called from SharePoint Add-Ins. In the mean time it is good that you can still use the API from REST. If you need to learn more on how to call the Work Management REST API use the SPRemoteAPIExplorer extension. A very useful extension!

What’s New in SharePoint 2016 Remote API Part 1

$
0
0
Technorati Tags: ,,

With the release of SharePoint 2016 Beta 2 last month I decided to start digging into what are some of the new features in the remote API. This will be the first in a series of posts about the new capabilities in the SharePoint 2016 remote API. Many of the new features have already shown up in earlier releases of SharePoint Online but now are available in SharePoint On-Premises. However, there are some very cool things showing up in the REST for On-Premises. Here is a short list:

  • File Management
  • REST Batching
  • Document Sets
  • Compliance
  • Search Analytics
  • Work Management
  • Project Server
  • Web Sharing

In this post I will give you examples of how to use the new SP.MoveCopyUtil class with REST and a refresher on using REST batching.

Remember having to use SPFile and SPFolder to move and copy files?

To move or copy files and folders the SharePoint object model provided the MoveTo and the CopyTo methods to shuffle files around in the same web. These methods were never exposed in the remote API in SharePoint 2013. These are now exposed in the remote API in SharePoint 2016. This is great news but when it came to copying or moving files easily it is still cumbersome having to get the file or folder and call the method. If you are working with URLs like in search results it would be nice to just tell the server to take the source URL and move or copy it to another URL.

Enter the SP.MoveCopyUtil class

The new Microsoft.SharePoint.MoveCopyUtil class can be used with CSOM, JSOM or REST. It has four methods CopyFile, MoveFile, CopyFolder and MoveFolder. Each method takes two arguments the source URL and the destination URL. All the methods are limited to moving and copying in the same site. The class and method are static so the method is called with dot notation rather than with a forward slash. Very easy. Below is an example of a REST call to copy a file from a SharePoint hosted Add-In.

function copyFile() {

var hostweburl = decodeURIComponent(getQueryStringParameter('SPHostUrl'));
var appweburl = decodeURIComponent(getQueryStringParameter('SPAppWebUrl'));
var restSource = appweburl + "/_api/SP.MoveCopyUtil.CopyFile";

$.ajax(
{
'url': restSource,
'method': 'POST',
'data': JSON.stringify({
'srcUrl': 'http://win2012r2dev/sites/SecondDev/Shared%20Documents/wp8_protocol.pdf',
'destUrl': 'http://win2012r2dev/sites/SecondDev/testdups/wp8_protocol.pdf'
}),
'headers': {
'accept': 'application/json;odata=verbose',
'content-type': 'application/json;odata=verbose',
'X-RequestDigest': $('#__REQUESTDIGEST').val()
},
'success': function (data) {
var d = data;
},
'error': function (err) {
alert(JSON.stringify(err));
}
}
);

}

Make Batch Rest Requests in SharePoint 2016


Office 365 has had the ability to to batch multiple REST commands into one request for a while. I have a post about this here SharePoint REST Batching Made Easy.This feature is now available in SharePoint 2016. With the new ability to move and copy files and folders with the new SP.MoveCopyUtil class I thought it would be a good candidate to use to demonstrate the new batch request feature. The code below uses the RestBatchExecutor code available on GitHub to batch together multiple requests to copy a file using SP.MoveCopyUtil.CopyFile. Basically if builds an array of javascript objects like:


{'srcUrl': 'http://win2012r2dev/sites/SecondDev/Shared%20Documents/file.pdf', 'destUrl': 'http://win2012r2dev/sites/SecondDev/testdups/file.pdf' }


Then we loop through the array setting the payload property and load the request into the batch. I tried this with 50 different URLs and it executed one REST request and copied all 50. Very nice.

function batchCopy() {
appweburl = decodeURIComponent(getQueryStringParameter('SPAppWebUrl'));
hostweburl = decodeURIComponent(getQueryStringParameter('SPHostUrl'));

var commands = [];
var batchExecutor = new RestBatchExecutor(appweburl, { 'X-RequestDigest': $('#__REQUESTDIGEST').val() });

batchRequest = new BatchRequest();
batchRequest.endpoint = appweburl + "/_api/SP.MoveCopyUtil.CopyFile";
batchRequest.verb = "POST";

var mappings = buildUrlMappings();

$.each(mappings, function(k, v){
batchRequest.payload = v;
commands.push({ id: batchExecutor.loadChangeRequest(batchRequest), title: 'Rest batch copy file' });
});


batchExecutor.executeAsync().done(function (result) {
var d = result;
var msg = [];
$.each(result, function (k, v) {
var command = $.grep(commands, function (command) {
return v.id === command.id;
});
if (command.length) {
msg.push("Command--" + command[0].title + "--" + v.result.status);
}
});

alert(msg.join('\r\n'));

}).fail(function (err) {
alert(JSON.stringify(err));
});

}

More SharePoint 2016 Remote API Features


The new SP.MoveCopyUtil class is very handy if you are dealing with URLs and don’t want to create a new SP.File every time you want to move or copy it. The same goes for folders. The class is very easy to use and works great with the new REST batching that is available. This is just the tip of the iceberg on the new remote API features. My next post will be about the new exposed methods on DocumentSets.

Viewing all 70 articles
Browse latest View live